Extend a Personal Network to Azure: Samba Server
July 20, 2023 - 15 min read (3000 words)
At this point in the series, we have created an Azure Virtual Network and established remote access to it using an Azure VPN Gateway from a remote network. The next step is create a Ubuntu virtual machine connected to that network to run Samba and provide shares to support backup clients on the remote network. In this post, we will create that server, a managed disk to store the data and then configure Samba for use on the hybrid network.
Table of Contents
Create a Managed Data Disk
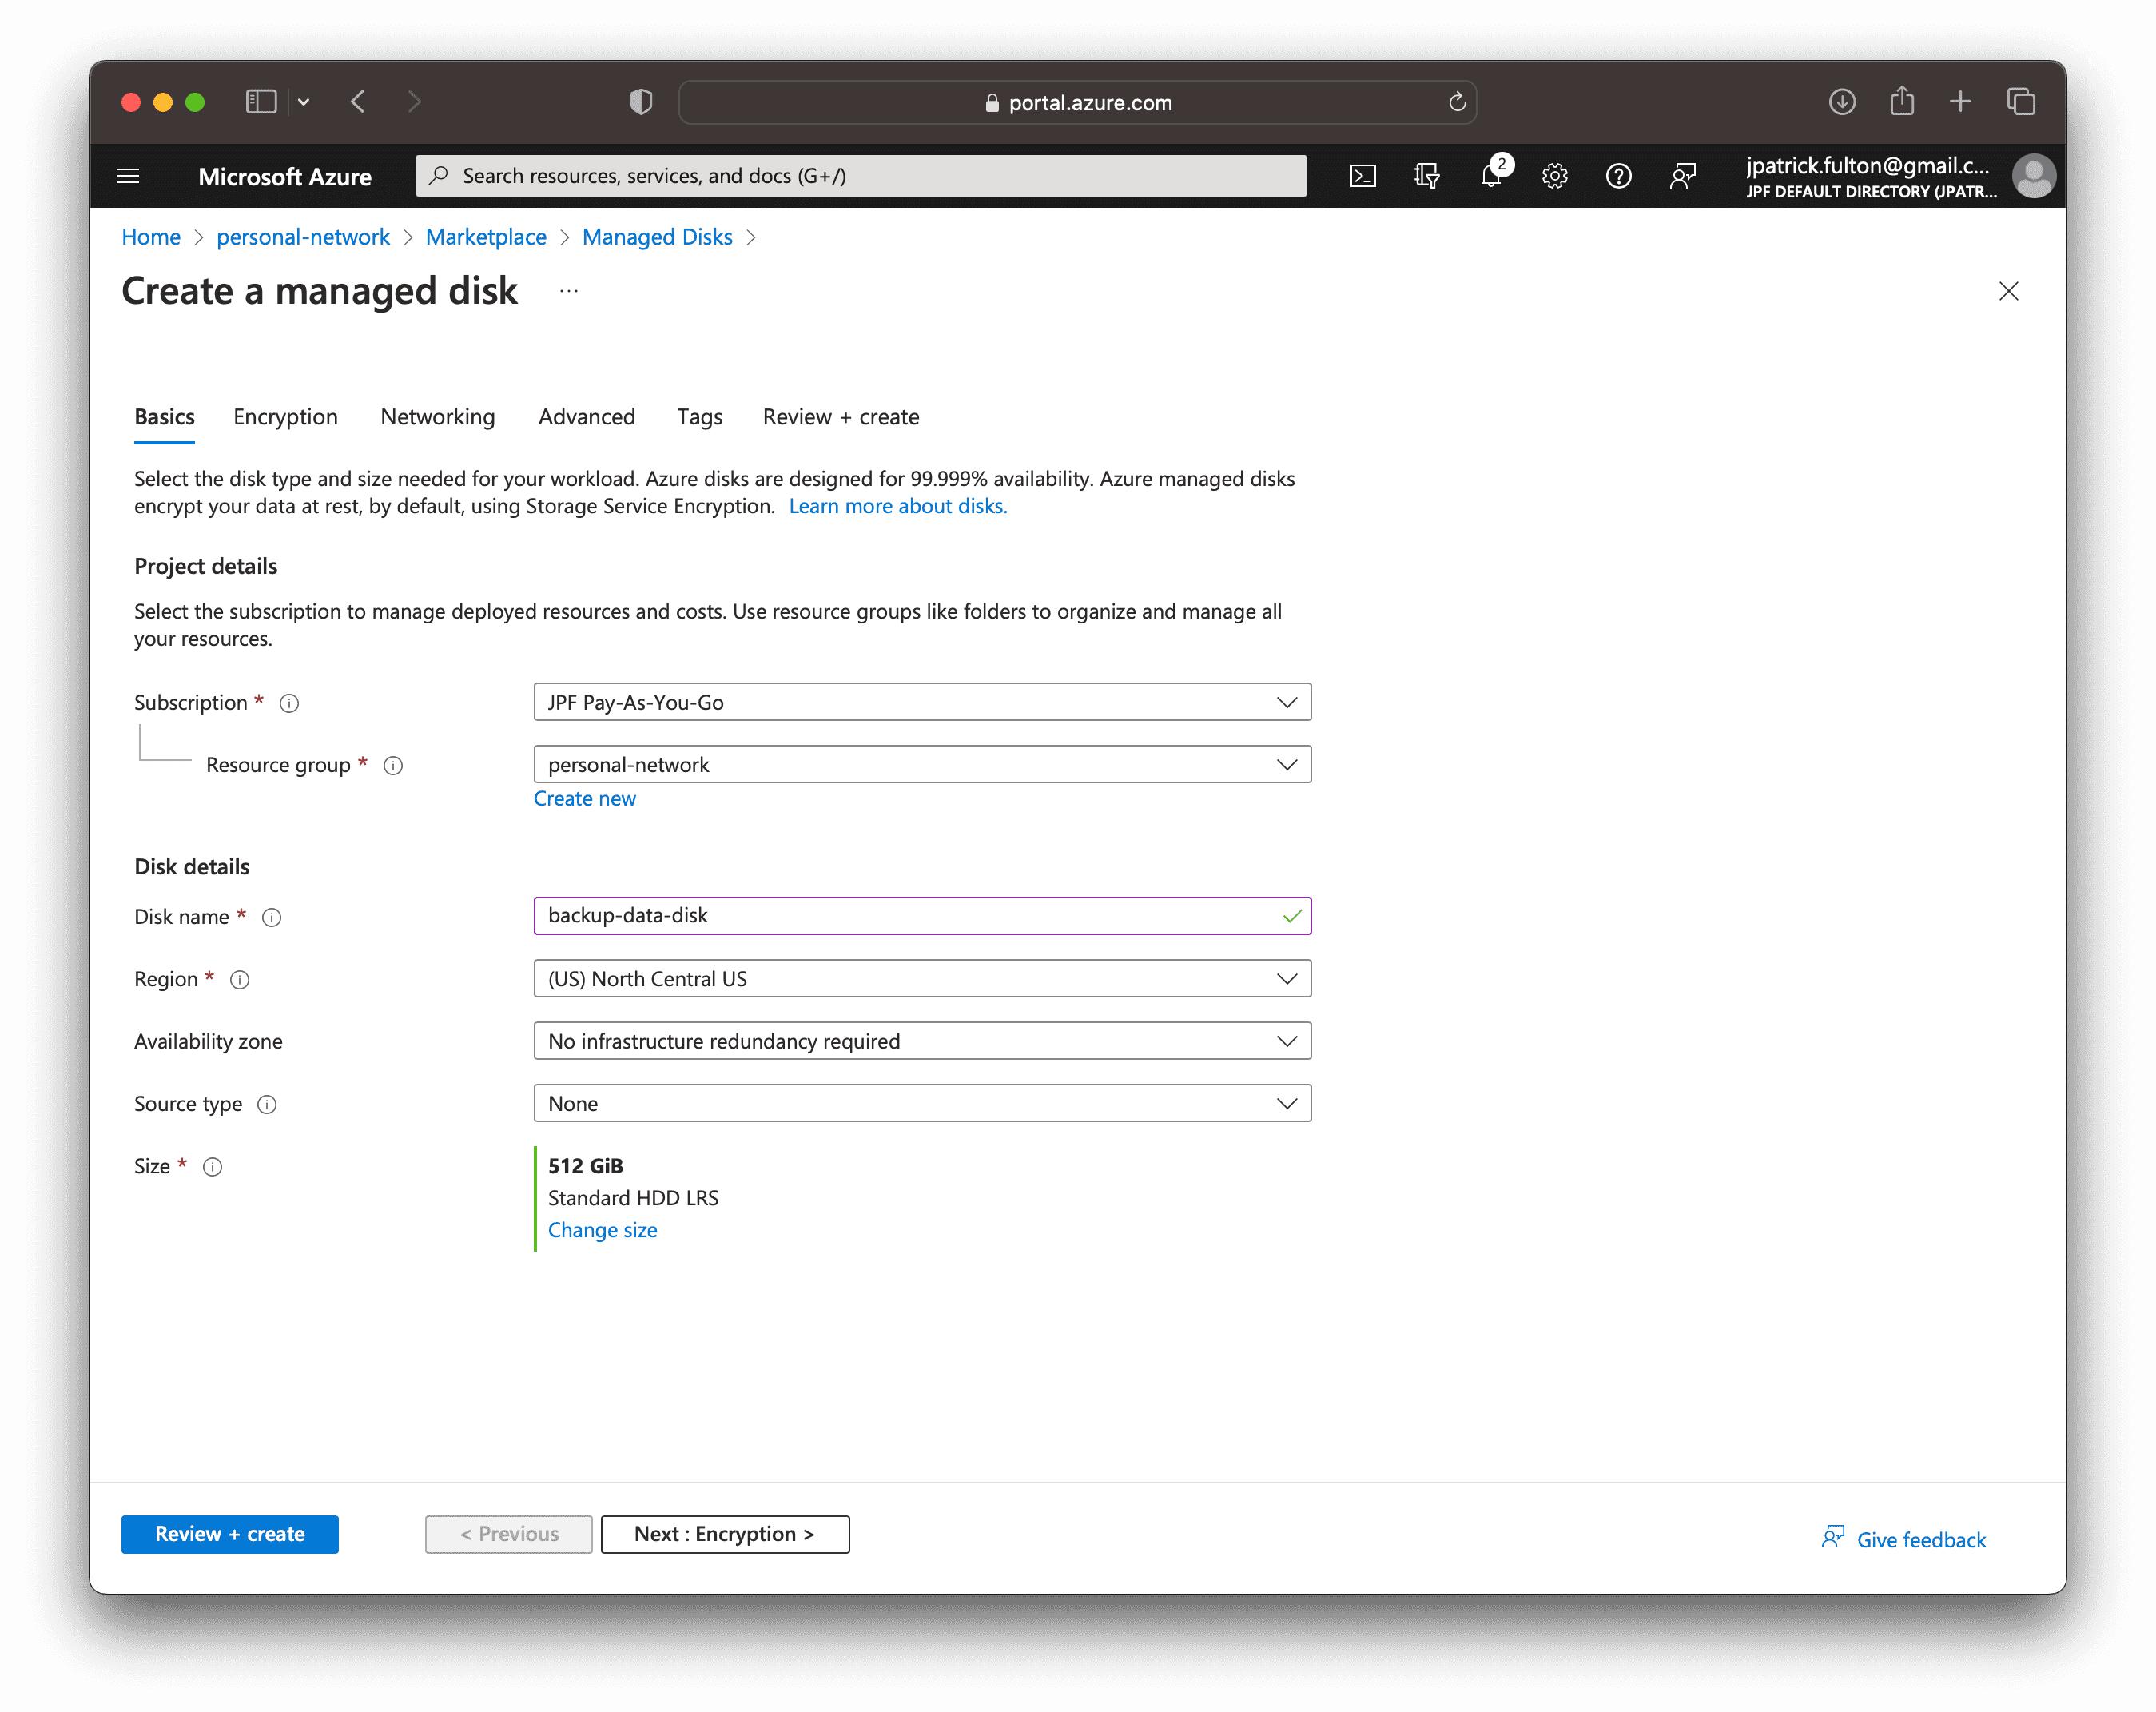
Before we begin creating a virtual machine, we need a data disk. The virtual machine creation process will initialize a disk for the operating system. However, it is best to separate the backup data from the OS disk for a number of reasons. Firstly, we will need more space than is available on the OS disk. Additionally, we may wish to easily move the data disk between machines or use the disk sharing features available on Azure Managed Disks.
From the resource group, select Create on the toolbar and search for
Managed Disk in the marketplace. Enter a name for the disk and select
a size. In this example, I am starting with a 512GB disk on a Standard HDD
model with locally redundant storage. Other premium models are available.
However, we will need neither their features, redundancy nor maximum IOPS
for this application.
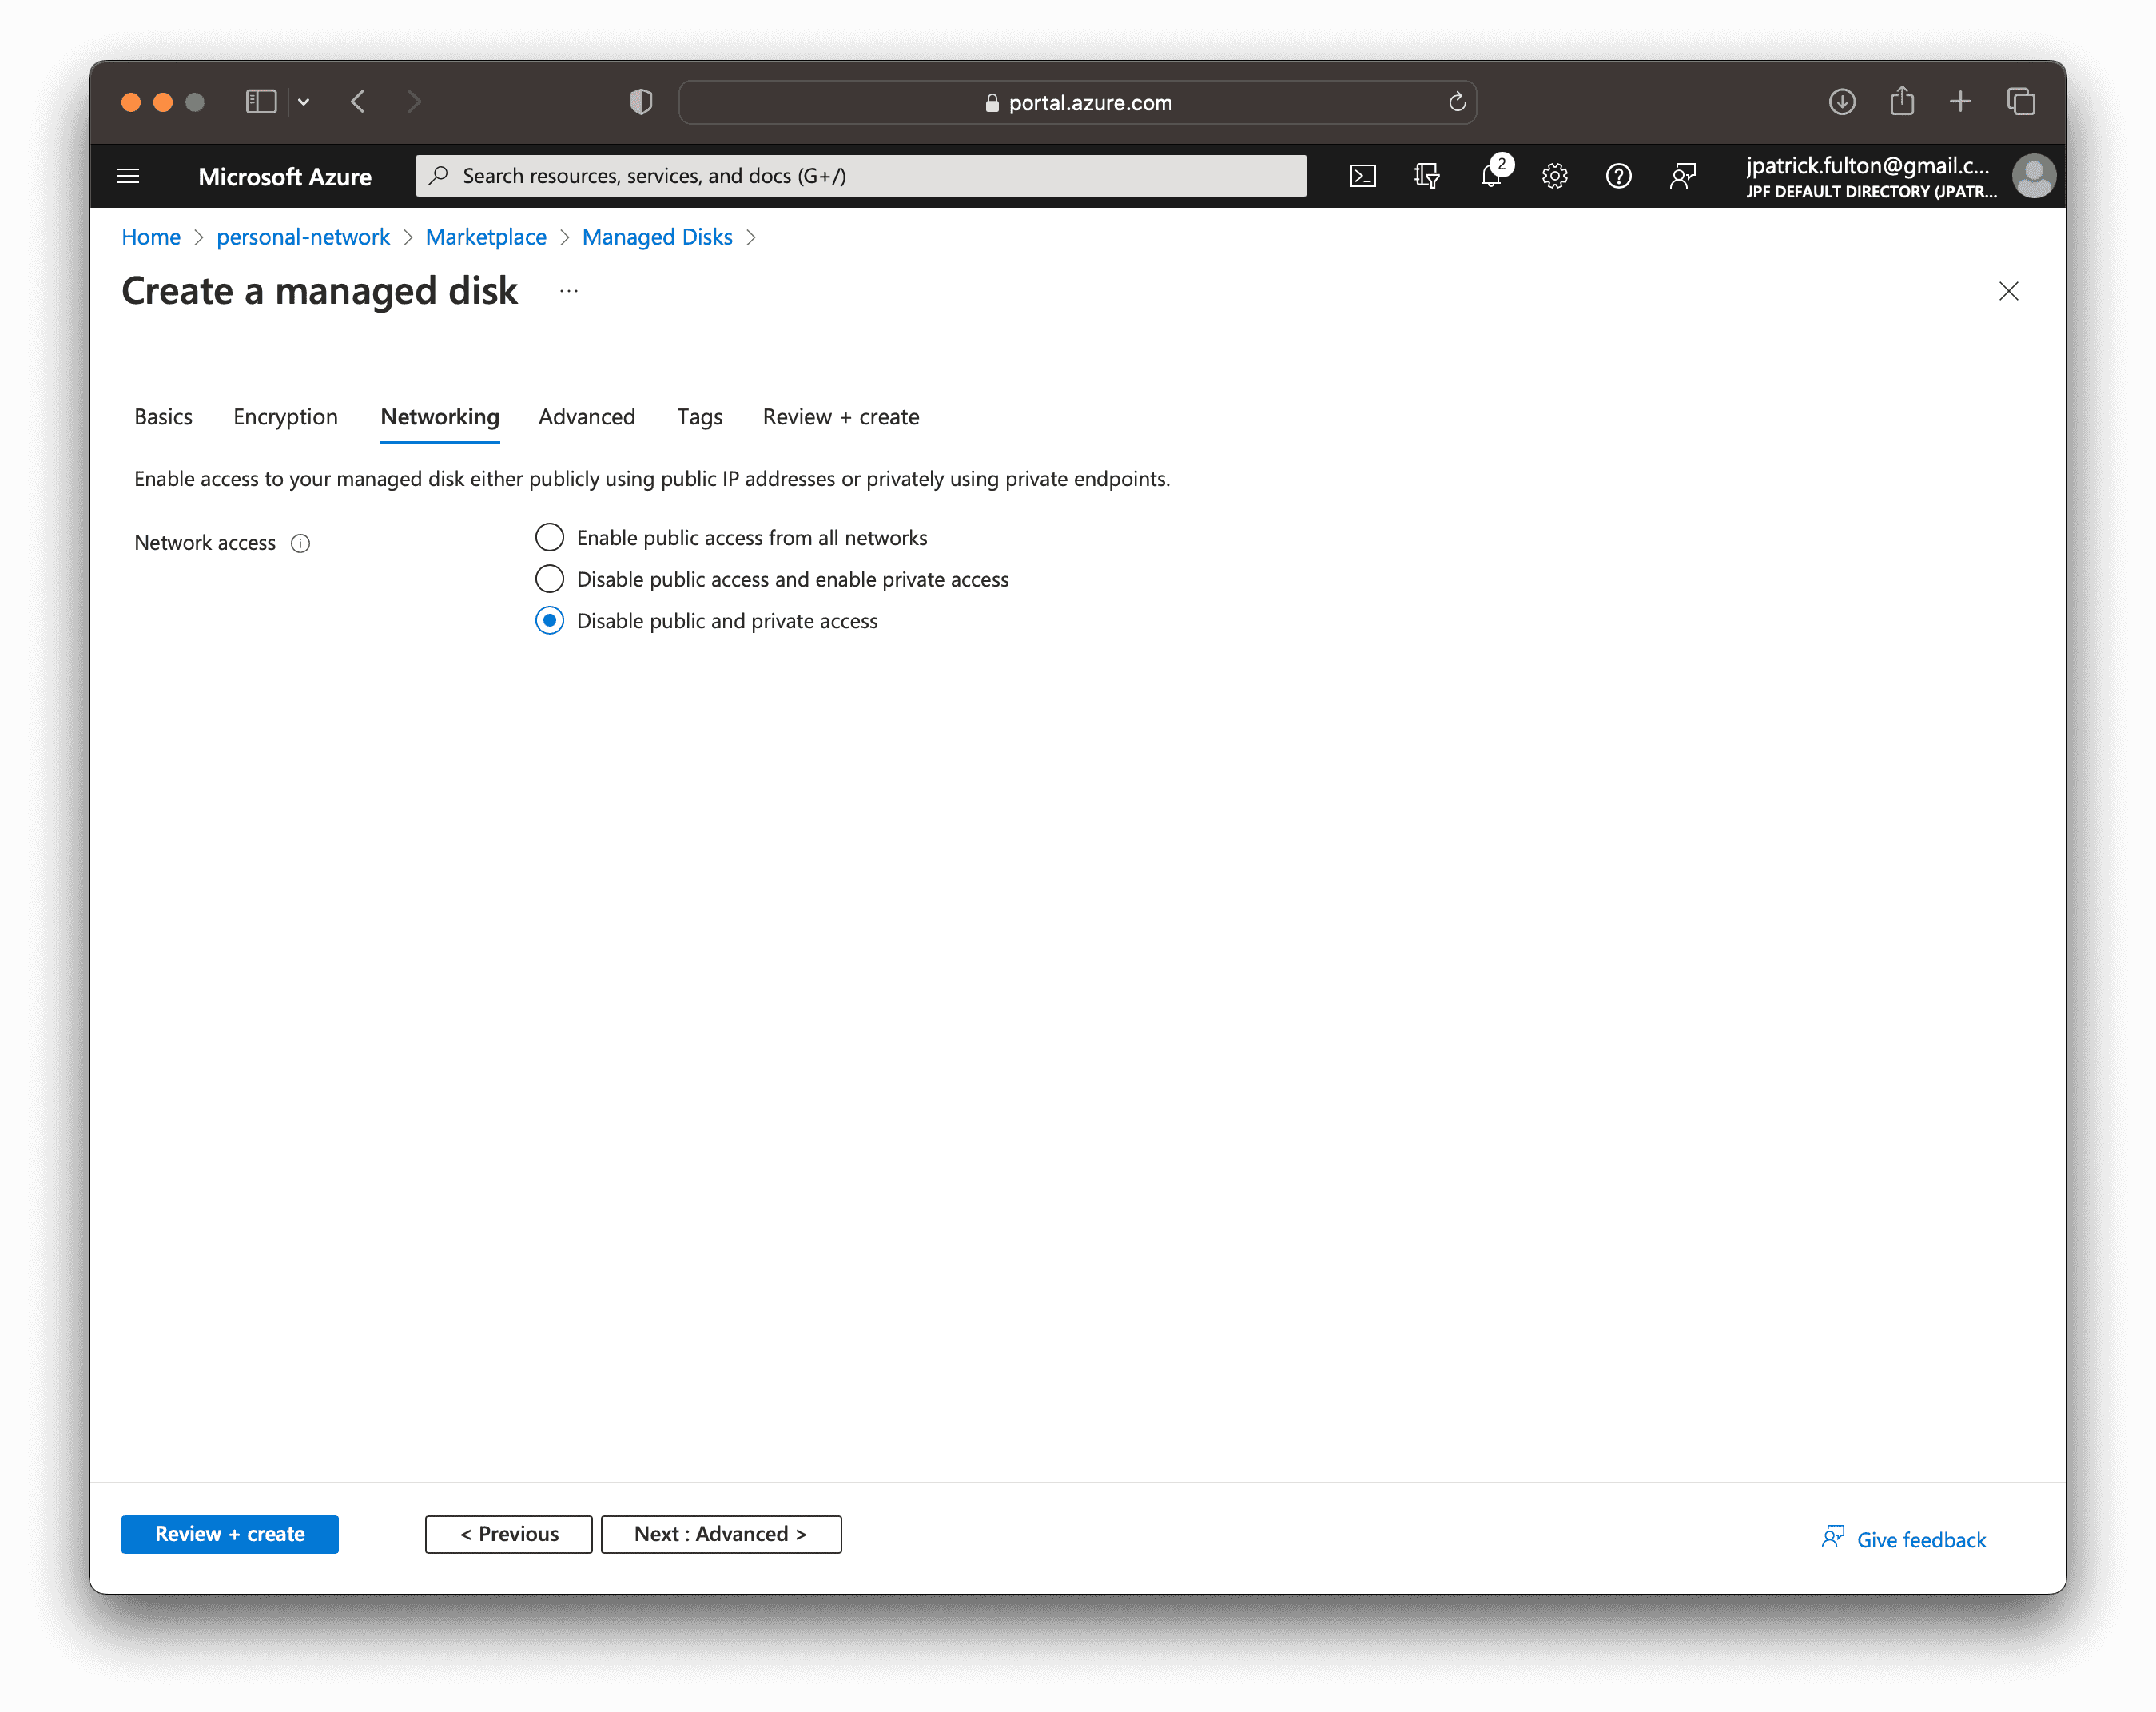
On the networking tab, ensure that both public and private access are disabled. We will not need them in this application and can elect to enable those features in the future as warranted.
Create a Virtual Machine
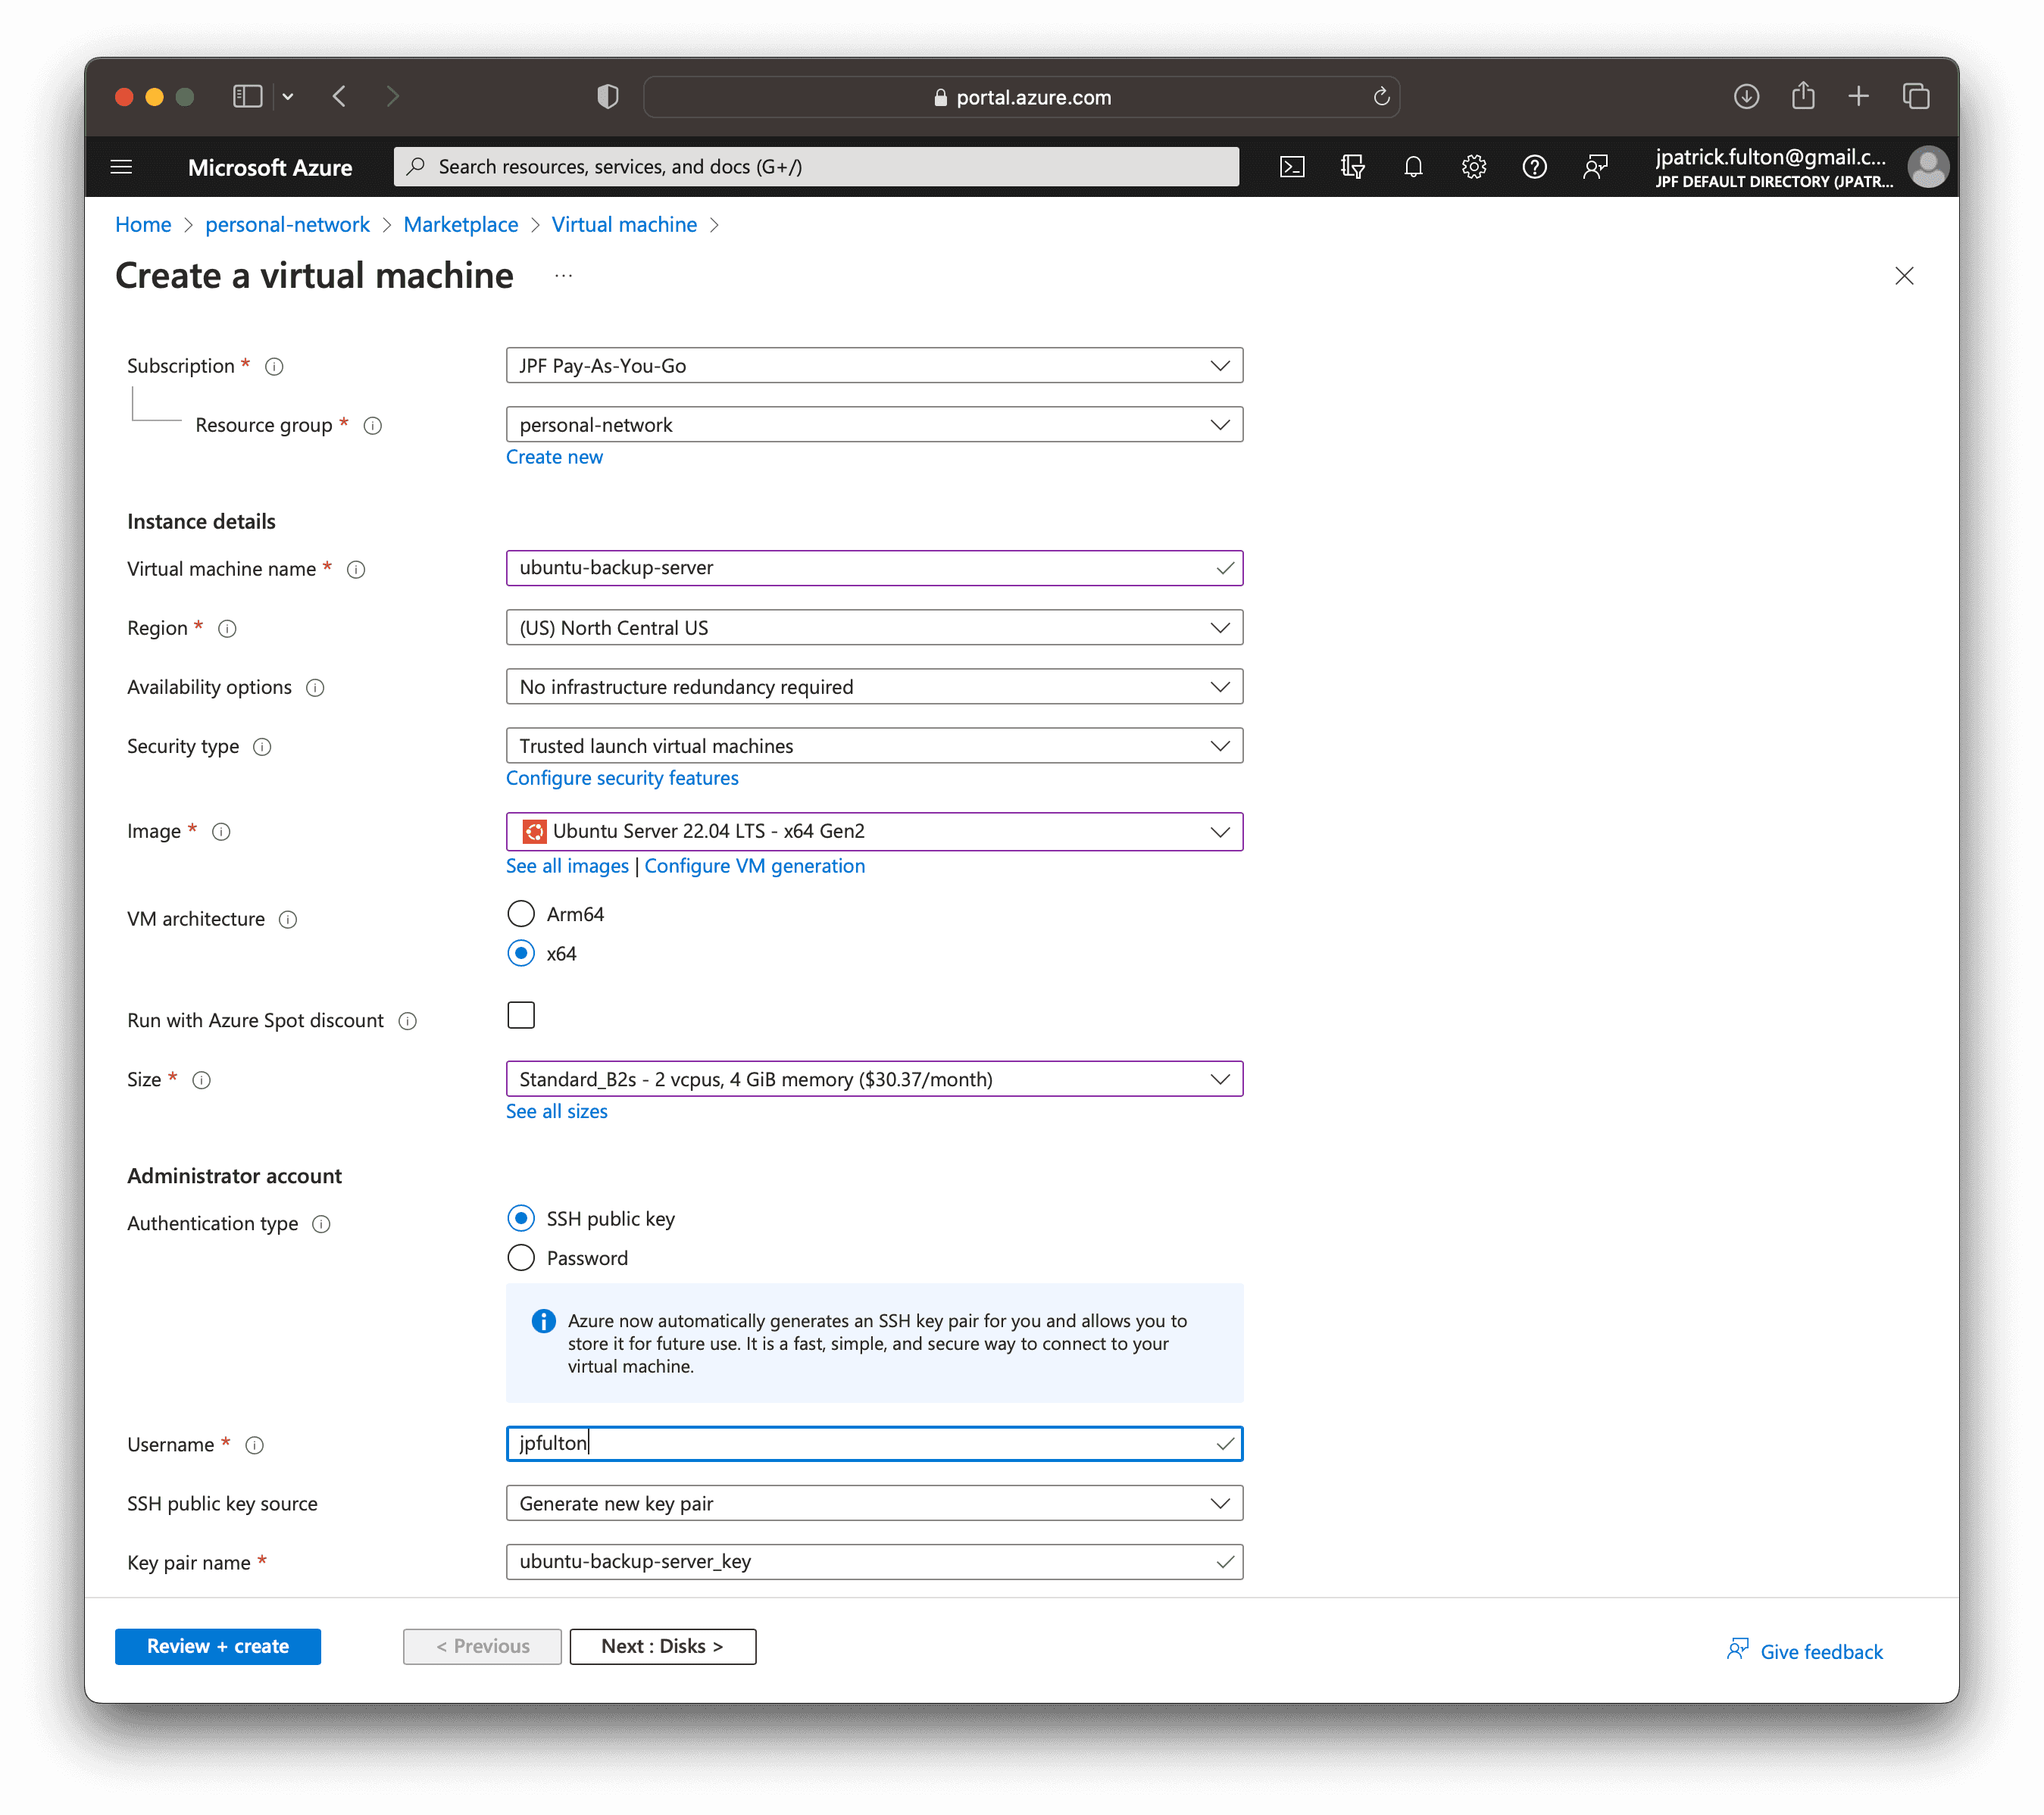
With a new data disk in place, we can begin to create a virtual machine to host the Samba service and to which we can attach the disk. From the resource group, select Create on the tool bar and search for Virtual Machine in the marketplace.
Enter a name for the server on the first step, select
Ubuntu Server 22.04 LTS as the image and choose Standard_B2s as the
virtual machine size.
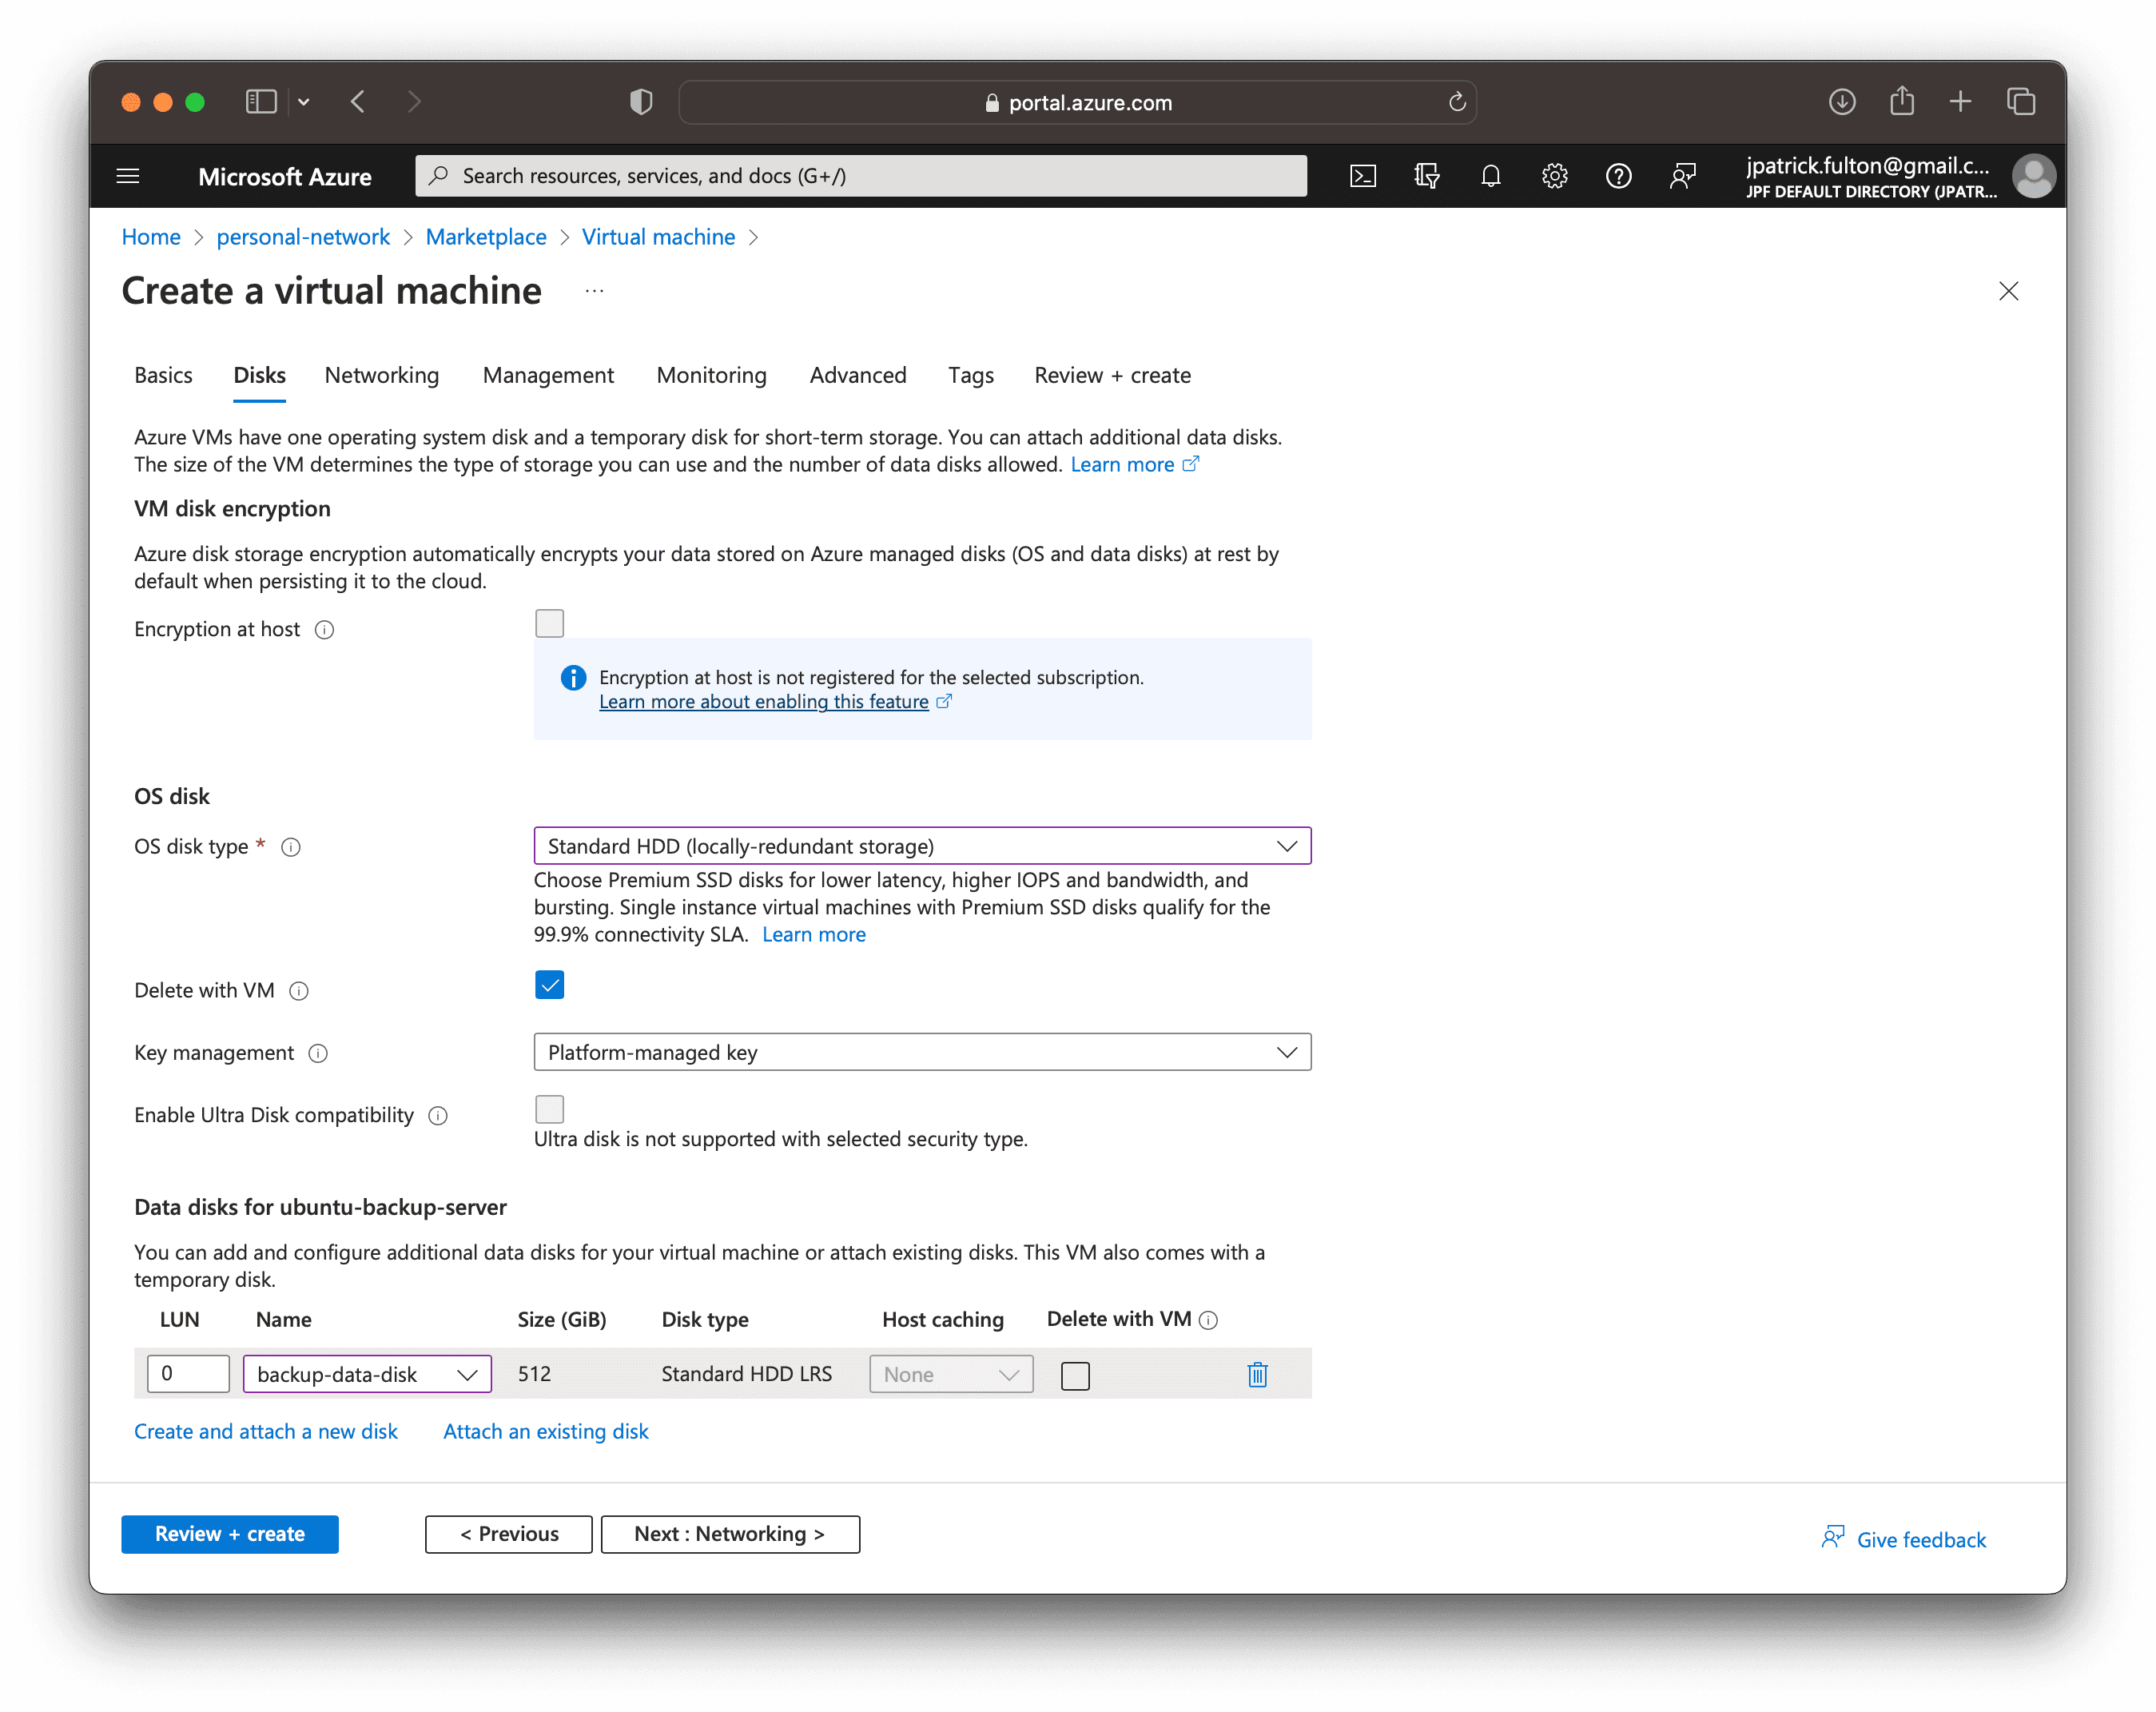
On the disks tab, change the OS disk type to Standard HHD. Under the
Data disks section, select Attach an existing disk and find the data
disk created in a previous step. Note that we will enable the Encryption at host
feature for this virtual machine in a later step.
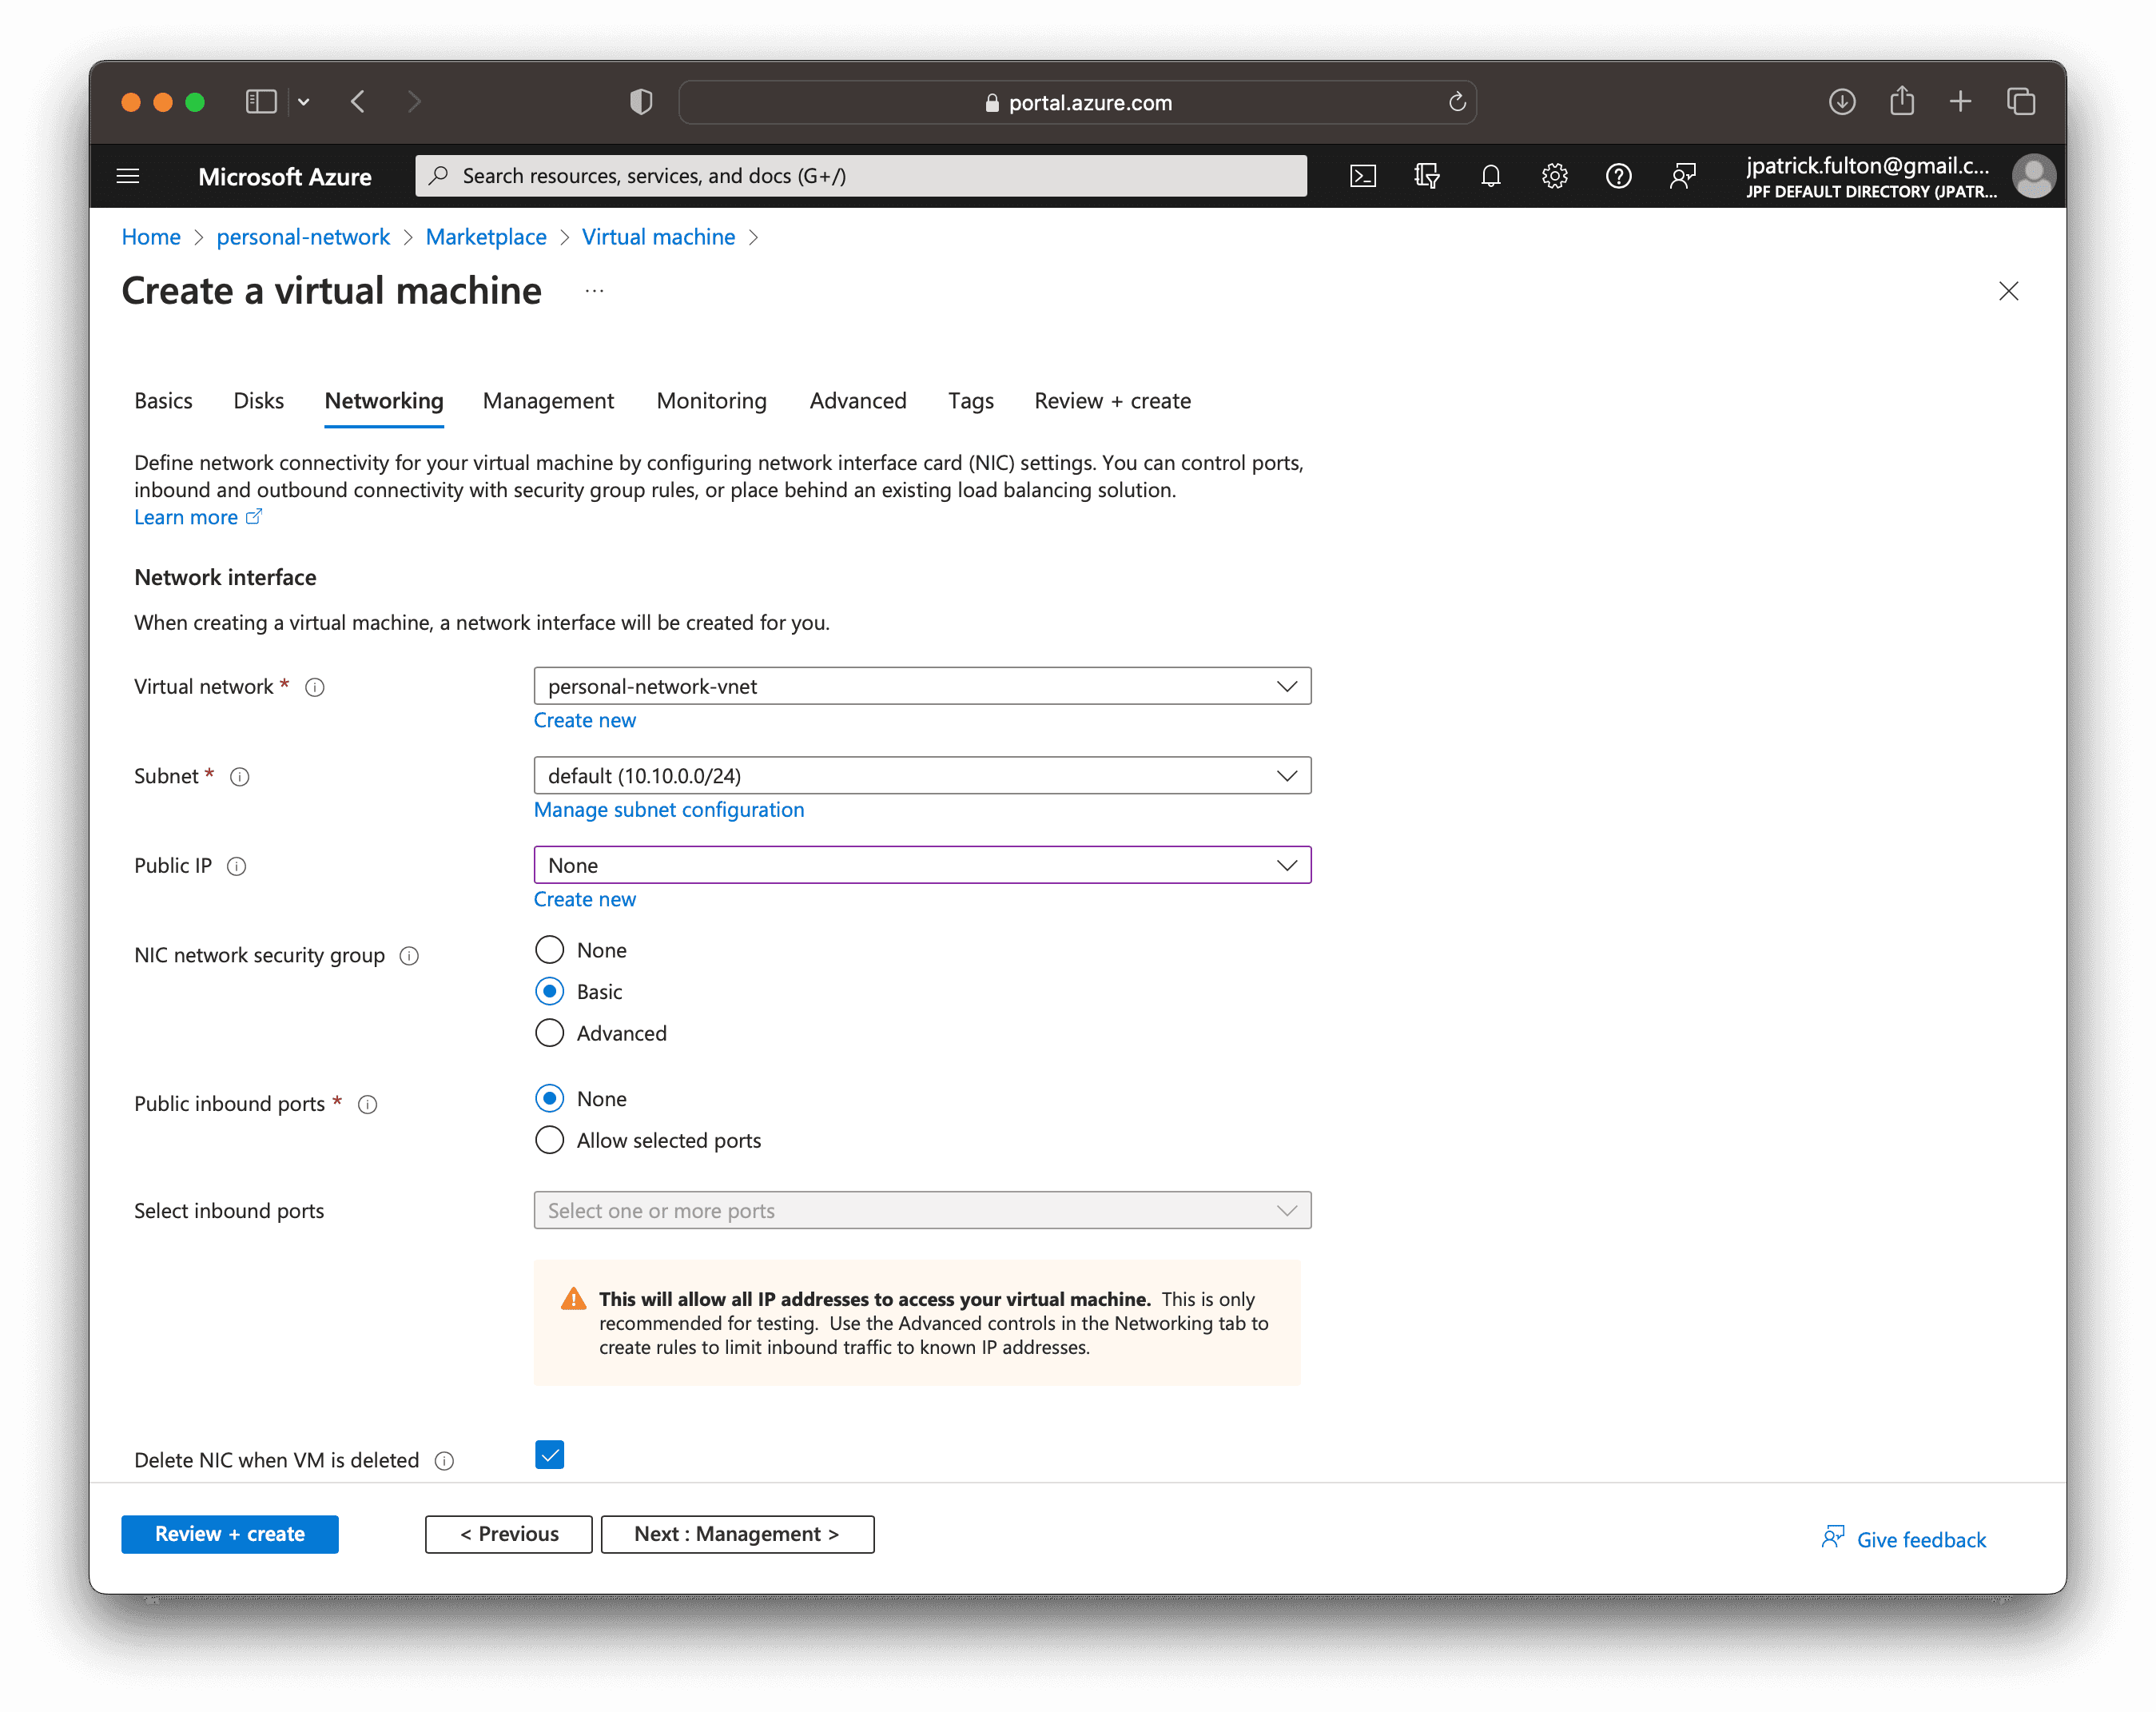
On the networking tab, change the Public IP option to None. This virtual machine
will only communicate on a private IP within the virtual network.
Select Review + create to validate and start the deployment. An ssh key will
be downloaded in the process.
Configure the Virtual Machine
With the new virtual machine created and running, we can begin to configure the guest operating system.
Login via SSH
Move the PEM file downloaded during the deployment to your ~/.ssh folder
and use it to log into the newly created server. The username must match
the one you selected during the virtual machine creation process and the private
IP may be found on the Networking tab on the newly created virtual machine
in the portal.
ssh -i ~/.ssh/ubuntu-backup-server_key.pem username@10.10.0.4Update All Packages
Update the packages from the base image using the following commands.
sudo apt update
sudo apt list --upgradeable
sudo apt upgrade
Set Up the Local Firewall
Next, we need to set up the local firewall. Neither the on-premise network nor the virtual network use IPv6. As a result, we should disable IPv6 on the firewall using the following this guide.
Set up a rule to allow ssh, a rule to allow Samba traffic and enable the firewall with the following commands.
sudo ufw allow ssh
sudo ufw allow samba
sudo ufw show added
Added user rules (see 'ufw status' for running firewall):
ufw allow 22/tcp
ufw allow Samba
sudo ufw enable
sudo ufw status numbered
Status: active

     To                         Action      From
     --                         ------      ----
[ 1] 22/tcp                     ALLOW IN    Anywhere
[ 2] Samba                      ALLOW IN    Anywhere
Mount and Format the Data Disk
With the operating system running and the firewall configured, the next step is to make use of the data disk. It was created in earlier step and is attached to the new machine. However, it does not yet have a usable file system.
First, we need to identify the data disk from within the guest operating system. To do so we run the following commands.
In a Linux virtual machine, the disk will present itself as a device
under /dev/sd*. However, the ordering in which the disk will appear
is stable during a single boot of the machine, not
between boots of the machine. As a result, the data disk may appear
as /dev/sda during one boot and then reappear as /dev/sdc in a second
boot of the machine. We can safely operate on the disk using its assigned
device to format and mount the host filesystem for these operations, but
we will need another mechanism to ensure it mounts cleanly after a reboot.
That mechanism is discussed below.
ls -la /dev/sd*
brw-rw---- 1 root disk 8,  0 Jul 18 03:06 /dev/sdabrw-rw---- 1 root disk 8, 16 Jul 18 03:06 /dev/sdb
brw-rw---- 1 root disk 8, 17 Jul 18 03:06 /dev/sdb1
brw-rw---- 1 root disk 8, 30 Jul 18 03:06 /dev/sdb14
brw-rw---- 1 root disk 8, 31 Jul 18 03:06 /dev/sdb15
brw-rw---- 1 root disk 8, 32 Jul 18 03:06 /dev/sdc
brw-rw---- 1 root disk 8, 33 Jul 18 03:06 /dev/sdc1
lsblk
NAME MAJ:MIN RM SIZE RO TYPE MOUNTPOINTS
loop0 7:0 0 63.4M 1 loop /snap/core20/1950
loop1 7:1 0 111.9M 1 loop /snap/lxd/24322
loop2 7:2 0 53.3M 1 loop /snap/snapd/19457
sda 8:0 0 512G 0 disksdb 8:16 0 30G 0 disk
├─sdb1 8:17 0 29.9G 0 part /
├─sdb14 8:30 0 4M 0 part
└─sdb15 8:31 0 106M 0 part /boot/efi
sdc 8:32 0 8G 0 disk
└─sdc1 8:33 0 8G 0 part /mnt
sr0 11:0 1 628K 0 romThe output of the previous commands shows that the data disk
is presented as /dev/sda. Next we need to create a partition for
the new filesystem using fdisk.
sudo fdisk /dev/sdaEnter p to view current partitions. Enter n then p to create a new primary
partition and accept the defaults to allow the partition to use the maximum amount
of space. Write the new partition structure to disk when given the option.
The next step is to create an ext4 filesystem on the new partition with the
following command.
sudo mkfs.ext4 /dev/sda1The new filesystem is in place. Next, we will create a folder to server as its mount point and then attempt a temporary mount to prove it is working. If the mount command executes without error, things have worked correctly.
sudo mkdir /backup
sudo mount -t ext4 -o rw /dev/sda1 /backup
Run lsblk to validate the mount operation.
lsblk
NAME    MAJ:MIN RM   SIZE RO TYPE MOUNTPOINTS
loop0     7:0    0  63.4M  1 loop /snap/core20/1950
loop1     7:1    0 111.9M  1 loop /snap/lxd/24322
loop2     7:2    0  53.3M  1 loop /snap/snapd/19457
sda       8:0    0   512G  0 disk└─sda1    8:1    0   512G  0 part /backupsdb       8:16   0    30G  0 disk
├─sdb1    8:17   0  29.9G  0 part /
├─sdb14   8:30   0     4M  0 part
└─sdb15   8:31   0   106M  0 part /boot/efi
sdc       8:32   0     8G  0 disk
└─sdc1    8:33   0     8G  0 part /mnt
sr0      11:0    1   628K  0 rom
Modify fstab
Our next objective is to ensure the data disk is mounted on every boot. As discussed above, we cannot reliably use the device name to accomplish this goal.
Run blkid to identify the UUID of the new filesystem. Using the UUID
is the only reliable way to ensure a clean mount in between boots on
a Linux virtual machine. Identify the UUID of the new filesystem.
sudo blkid
/dev/sda1: UUID="e562be7f-ffa0-46df-b57a-16e0b265aea1" BLOCK_SIZE="4096" TYPE="ext4" PARTUUID="b56e4a70-01"/dev/sdc1: UUID="44accf23-56c1-486a-af6b-a2146d6a8a63" BLOCK_SIZE="4096" TYPE="ext4" PARTUUID="98e21008-01"
/dev/sdb15: LABEL_FATBOOT="UEFI" LABEL="UEFI" UUID="B6C3-B75F" BLOCK_SIZE="512" TYPE="vfat" PARTUUID="a295d76d-648c-4a4b-a3e0-b6307dd6e209"
/dev/sdb1: LABEL="cloudimg-rootfs" UUID="1c12acfb-8f0c-440f-b6b7-6c22c1f36e1e" BLOCK_SIZE="4096" TYPE="ext4" PARTUUID="ee1583fb-fd94-4b13-98b6-5f25e7fa4580"
/dev/loop1: TYPE="squashfs"
/dev/loop2: TYPE="squashfs"
/dev/loop0: TYPE="squashfs"
/dev/loop3: TYPE="squashfs"
/dev/sdb14: PARTUUID="b857fc35-18dc-48df-b3f0-ae83aa33b319"
Now we can edit /etc/fstab with sudo vim /etc/fstab to create a new
entry for the backup filesystem.
# CLOUD_IMG: This file was created/modified by the Cloud Image build process
UUID=1c12acfb-8f0c-440f-b6b7-6c22c1f36e1e /  ext4 discard,errors=remount-ro 0 1
UUID=B6C3-B75F /boot/efi vfat umask=0077 0 1
/dev/disk/cloud/azure_resource-part1 /mnt auto defaults,nofail,x-systemd.requires=cloud-init.service,_netdev,comment=cloudconfig 0 2
UUID=e562be7f-ffa0-46df-b57a-16e0b265aea1 /backup ext4 rw 0 0
Restart with sudo shutdown -r to prove the /etc/fstab changes.
Encrypt the Disks
While our disks are currently encrypted at rest using platform managed keys,
to enable full end-to-end encryption, we need to use the Encrypt at Host
Azure feature. If the option to use this feature is disabled in the virtual machine
creation process, as it was in the screenshot from above, it is necessary to register
the feature for the subscription prior to using it. In this section, we will use
the Azure CLI to register the feature and then enable it for the virtual machine
we just created.
Enable the Encrypt at Host Azure Feature
Following the Azure
documentation,
run the following commands to leverage the Azure CLI to enable
EncryptionAtHost for the subscription.
az login
az feature register --name EncryptionAtHost  --namespace Microsoft.Compute
Once the feature 'EncryptionAtHost' is registered, invoking 'az provider register -n Microsoft.Compute' is required to get the change propagated
{
  "id": "/subscriptions/4913be3f-a345-4652-9bba-767418dd25e3/providers/Microsoft.Features/providers/Microsoft.Compute/features/EncryptionAtHost",
  "name": "Microsoft.Compute/EncryptionAtHost",
  "properties": {
    "state": "Registering"
  },
  "type": "Microsoft.Features/providers/features"
}
Check the status of the registration using the following command.
Wait a few minutes until the output shows Registered.
az feature show --name EncryptionAtHost --namespace Microsoft.Compute
{
  "id": "/subscriptions/4913be3f-a345-4652-9bba-767418dd25e3/providers/Microsoft.Features/providers/Microsoft.Compute/features/EncryptionAtHost",
  "name": "Microsoft.Compute/EncryptionAtHost",
  "properties": {
    "state": "Registered"
  },
  "type": "Microsoft.Features/providers/features"
}
Propagate the change per output of the earlier command.
az provider register -n Microsoft.ComputeEnable Encryption at Host for the Virtual Machine
To enable encryption at host for the virtual machine, it must first
be stopped. This can be accomplished either from the guest operating system
with a sudo shutdown command or through the Azure portal.
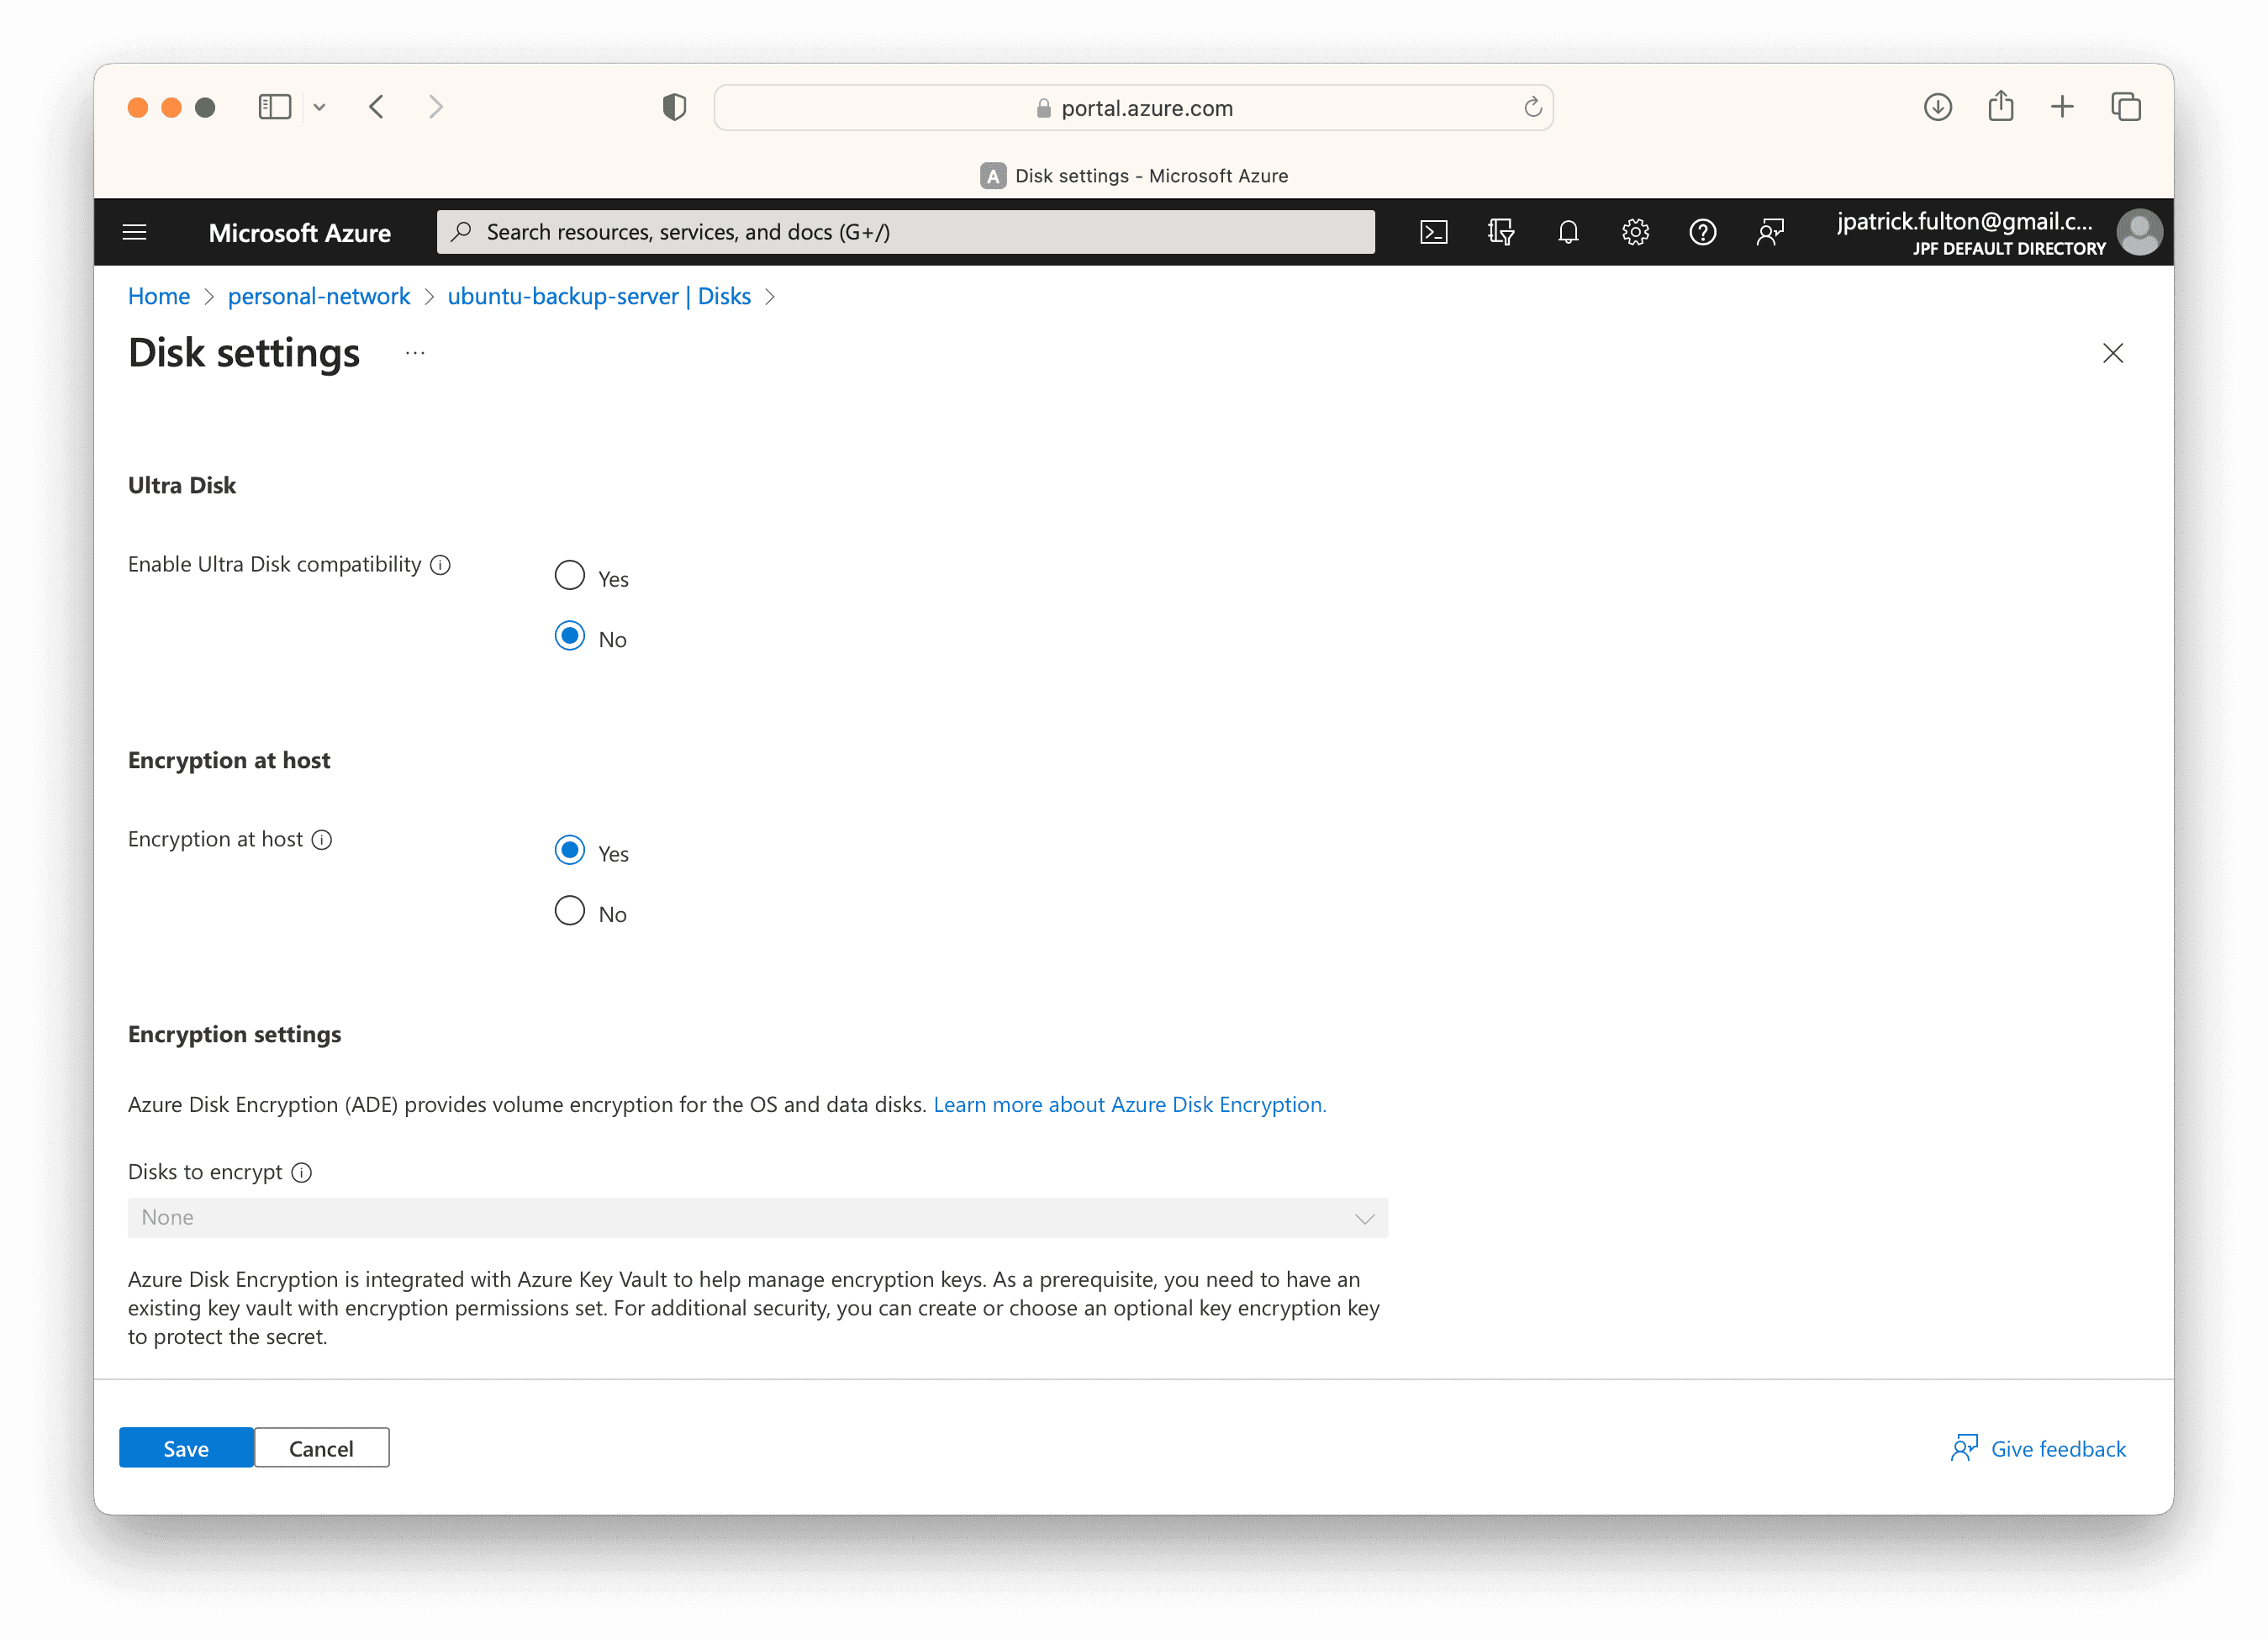
Stop the virtual machine. Then, from the virtual machine resource in the portal, select Disks > Additional Settings. Enable the Encryption at host option and select Save.
Restart the virtual machine and log back in via ssh.
Install Samba
With the disks encrypted, the data disk mounted and the operating system updated from the base image, we can begin to install and configure the Samba service. To install Samba, run the following command.
sudo apt install sambaCreate Dedicated Samba User and Group
For the management of local file and directory permissions in this Samba configuration, we will need a local user and group for the Samba service to utilize. These can be created with the following commands.
sudo addgroup smbgroup
sudo adduser --system --no-create-home --ingroup smbgroup smbuser
Create Share Folders and Change Ownership
Next, we need to create some folders on the backup filesystem to host data from the shares we will be configuring in later steps. These folders need to be owned by the user and group we created in the last step.
cd /backup
sudo mkdir applebackups
sudo mkdir linuxbackups
sudo chown smbuser:smbgroup applebackups
sudo chown smbuser:smbgroup linuxbackups
ls -la
total 32
drwxr-xr-x  5 root    root      4096 Jul 18 04:31 .
drwxr-xr-x 20 root    root      4096 Jul 18 03:51 ..
drwxr-xr-x  2 smbuser smbgroup  4096 Jul 18 04:26 applebackups
drwxr-xr-x  3 smbuser smbgroup  4096 Jul 18 04:45 linuxbackups
drwx------  2 root    root     16384 Jul 18 03:38 lost+found
Create Samba Users for Share Access
Samba leverages local system accounts in the configuration we will be creating
for authentication. However, we do not want those users to log into the
machine directly nor have dedicated home folders under /home in the operating
system filesystem. To accomplish this goal, we will use the adduser command
and supply both the --no-create-home flag and a shell parameter that
points to /sbin/nologin. The commands below create the users we will be
using and allows us to set a Samba password for each.
sudo adduser --no-create-home --shell /sbin/nologin applebackup
sudo smbpasswd -a applebackup
sudo adduser --no-create-home --shell /sbin/nologin linuxbackup
sudo smbpasswd -a linuxbackupEdit /etc/samba/smb.conf to Configure Samba
The Samba service now needs to be configured. Edit the configuration with the following command.
sudo vim /etc/samba/smb.confIn
a previous post, I discussed
the settings that are necessary to support macOS Time Machine backups. Again,
we will need to add those settings to this smb.conf as we wish to support
that platform for one of the two shares that we will create. Add the following
lines to the [global] section of the server configuration file. A detailed
discussion of these lines can be found in the post referenced above.
### Time Machine Compatibility ###
min protocol = SMB2
vfs objects = catia fruit streams_xattr
fruit:nfs_aces = no
fruit:metadata = stream
fruit:model = MacSamba
fruit:posix_rename = yes
fruit:veto_appledouble = no
fruit:wipe_intentionally_left_blank_rfork = yes
fruit:delete_empty_adfiles = yes
server min protocol = SMB2
Next, we wish to configure two shares: one for use by Ubuntu backup clients and another for use by macOS clients. Add the following lines to bottom of the file to configure these shares.
[applebackups]
comment = Apple Backup Shared Folder by Samba Server on Ubuntu
path = /backup/applebackups
fruit:time machine = yes
force user = smbuser
force group = smbgroup
read only = no
browseable = yes
create mask = 0664
force create mode = 0664
directory mask = 0775
force directory mode = 0775
valid users = applebackup

[linuxbackups]
comment = Linux Backup Shared Folder by Samba Server on Ubuntu
path = /backup/linuxbackups
force user = smbuser
force group = smbgroup
read only = no
browseable = yes
create mask = 0664
force create mode = 0664
directory mask = 0775
force directory mode = 0775
valid users = linuxbackup
Start the Samba Service
The Samba service is now configured and may be started with the following command.
sudo systemctl start sambaOnce started, use a SMB client to test the configuration.
Monitor Disk Usage
Once backup clients are configured to run and use the shares, monitoring disk usage will become important. In a later post, we will set up an alerting system. In the meantime, we can poll to monitor filesystem usage.
Monitor from a Command
While logged into a shell, the df command allows us to observe disk
usage.
df -H
Filesystem      Size  Used Avail Use% Mounted on
/dev/root        32G  2.5G   29G   8% /
tmpfs           2.1G     0  2.1G   0% /dev/shm
tmpfs           811M  4.7M  806M   1% /run
tmpfs           5.3M     0  5.3M   0% /run/lock
/dev/sdb15      110M  6.4M  104M   6% /boot/efi
/dev/sda1       540G  111G  402G  22% /backup
/dev/sdc1       8.4G   29k  8.0G   1% /mnt
tmpfs           406M  4.1k  406M   1% /run/user/1000
Setup Monitoring and System Status using the MOTD
By default, Ubuntu installations already provide a nice message
of the day system that displays useful information when an interactive
shell is opened. This system can be customized by placing scripts
in the /etc/update-motd.d/ folder. In this section, we will install several
packages and create a custom MOTD script to output system statistics
including disk usage when we log into the server.
First, install the script dependencies using the following commands.
sudo apt install neofetch
sudo apt install inxi
Next, create custom MOTD script using vim with following command. The numeric prefix to the file will determine the order in which it appears within the MOTD script output series.
sudo vim /etc/update-motd.d/01-customInclude the following lines in the script and save it.
#!/bin/sh
echo
echo "General System Information:"
echo
/usr/bin/neofetch --disable title --color_blocks off

echo
echo "System Disk Usage:"
/usr/bin/inxi -D -p
Update the file permissions to make it executable.
sudo chmod a+x /etc/update-motd.d/01-customLogout and log back in to see the new output.
Welcome to Ubuntu 22.04.2 LTS (GNU/Linux 5.15.0-1041-azure x86_64)

General System Information:

            .-/+oossssoo+/-.
        `:+ssssssssssssssssss+:`           OS: Ubuntu 22.04.2 LTS x86_64
      -+ssssssssssssssssssyyssss+-         Host: Virtual Machine Hyper-V UEFI R
    .ossssssssssssssssssdMMMNysssso.       Kernel: 5.15.0-1041-azure
   /ssssssssssshdmmNNmmyNMMMMhssssss/      Uptime: 13 hours, 50 mins
  +ssssssssshmydMMMMMMMNddddyssssssss+     Packages: 793 (dpkg), 4 (snap)
 /sssssssshNMMMyhhyyyyhmNMMMNhssssssss/    Shell: bash 5.1.16
.ssssssssdMMMNhsssssssssshNMMMdssssssss.   Resolution: 1024x768
+sssshhhyNMMNyssssssssssssyNMMMysssssss+   Terminal: run-parts
ossyNMMMNyMMhsssssssssssssshmmmhssssssso   CPU: Intel Xeon E5-2673 v3 (2) @ 2.3
ossyNMMMNyMMhsssssssssssssshmmmhssssssso   Memory: 425MiB / 3863MiB
+sssshhhyNMMNyssssssssssssyNMMMysssssss+
.ssssssssdMMMNhsssssssssshNMMMdssssssss.
 /sssssssshNMMMyhhyyyyhdNMMMNhssssssss/
  +sssssssssdmydMMMMMMMMddddyssssssss+
   /ssssssssssshdmNNNNmyNMMMMhssssss/
    .ossssssssssssssssssdMMMNysssso.
      -+sssssssssssssssssyyyssss+-
        `:+ssssssssssssssssss+:`
            .-/+oossssoo+/-.


System Disk Usage:
Drives:
  Local Storage: total: 550 GiB used: 109.32 GiB (19.9%)
  ID-1: /dev/sda model: Virtual Disk size: 512 GiB
  ID-2: /dev/sdb model: Virtual Disk size: 30 GiB
  ID-3: /dev/sdc model: Virtual Disk size: 8 GiB
Partition:
  ID-1: / size: 28.89 GiB used: 2.62 GiB (9.1%) fs: ext4 dev: /dev/sdb1
  ID-2: /backup size: 502.89 GiB used: 106.7 GiB (21.2%) fs: ext4 dev: /dev/sda1
  ID-3: /boot/efi size: 104.4 MiB used: 6 MiB (5.8%) fs: vfat dev: /dev/sdb15
  ID-4: /mnt size: 7.77 GiB used: 28 KiB (0.0%) fs: ext4 dev: /dev/sdc1
Wrapping Up
At the end of these steps, we have our first virtual machine within the cloud network providing services to the rest of the workflow. In a later post, we will look at mechanisms to expand the size of backup data disk and ways to save on cloud cost by identify this backup system as an interruptible workflow by using a spot instance to host it. In the next post in the series, we will examine the creation of a customer managed solution to replace the Azure VPN Gateway resource to realize additional cloud cost savings.

Written by J. Patrick Fulton.