Extend a Personal Network to Azure: VPN Gateway
July 19, 2023 - 7 min read (1251 words)
The Azure VPN Gateway is a high availability resource designed to provide virtual private networking tunnels to Azure virtual networks. It can be configured to connect an on-premise network to the cloud and also to support point-to-site clients. Among its primary advantages is the ability to manage the resource through the Azure Portal or Azure CLI. In this post, we will create an Azure VPN Gateway to connect an on-premise network to a virtual network in the cloud.
With support for OpenVPN, IKEv2 and/or SSTP, the Azure VPN Gateway is implemented
through two or more Azure-managed virtual machines that are placed on a GatewaySubnet
within the virtual network.
Selecting the correct SKU is important while setting up the resource. The monthly
cost differences are significant between various models of the resource as are
the capabilities, aggregate bandwidth support and management features. While
the Basic SKU is most economical, it has limited features and cannot support
the IKEv2 and OpenVPN tunnel types which provide cross-platform support
in a point-to-site configuration. Additionally, resources of the Basic SKU
cannot be resized to other SKUs. They must first be deleted and new resources
created in their place. To provide cross-platform support, this post will use the
VpnGw1.
As this type of Azure resource is best suited for enterprise applications, later this post series, we will replace the VPN gateway resource with a custom implementation based on a self-managed Ubuntu virtual machine. If you wish to skip ahead, that post is available here.
Table of Contents
Create a VPN Gateway
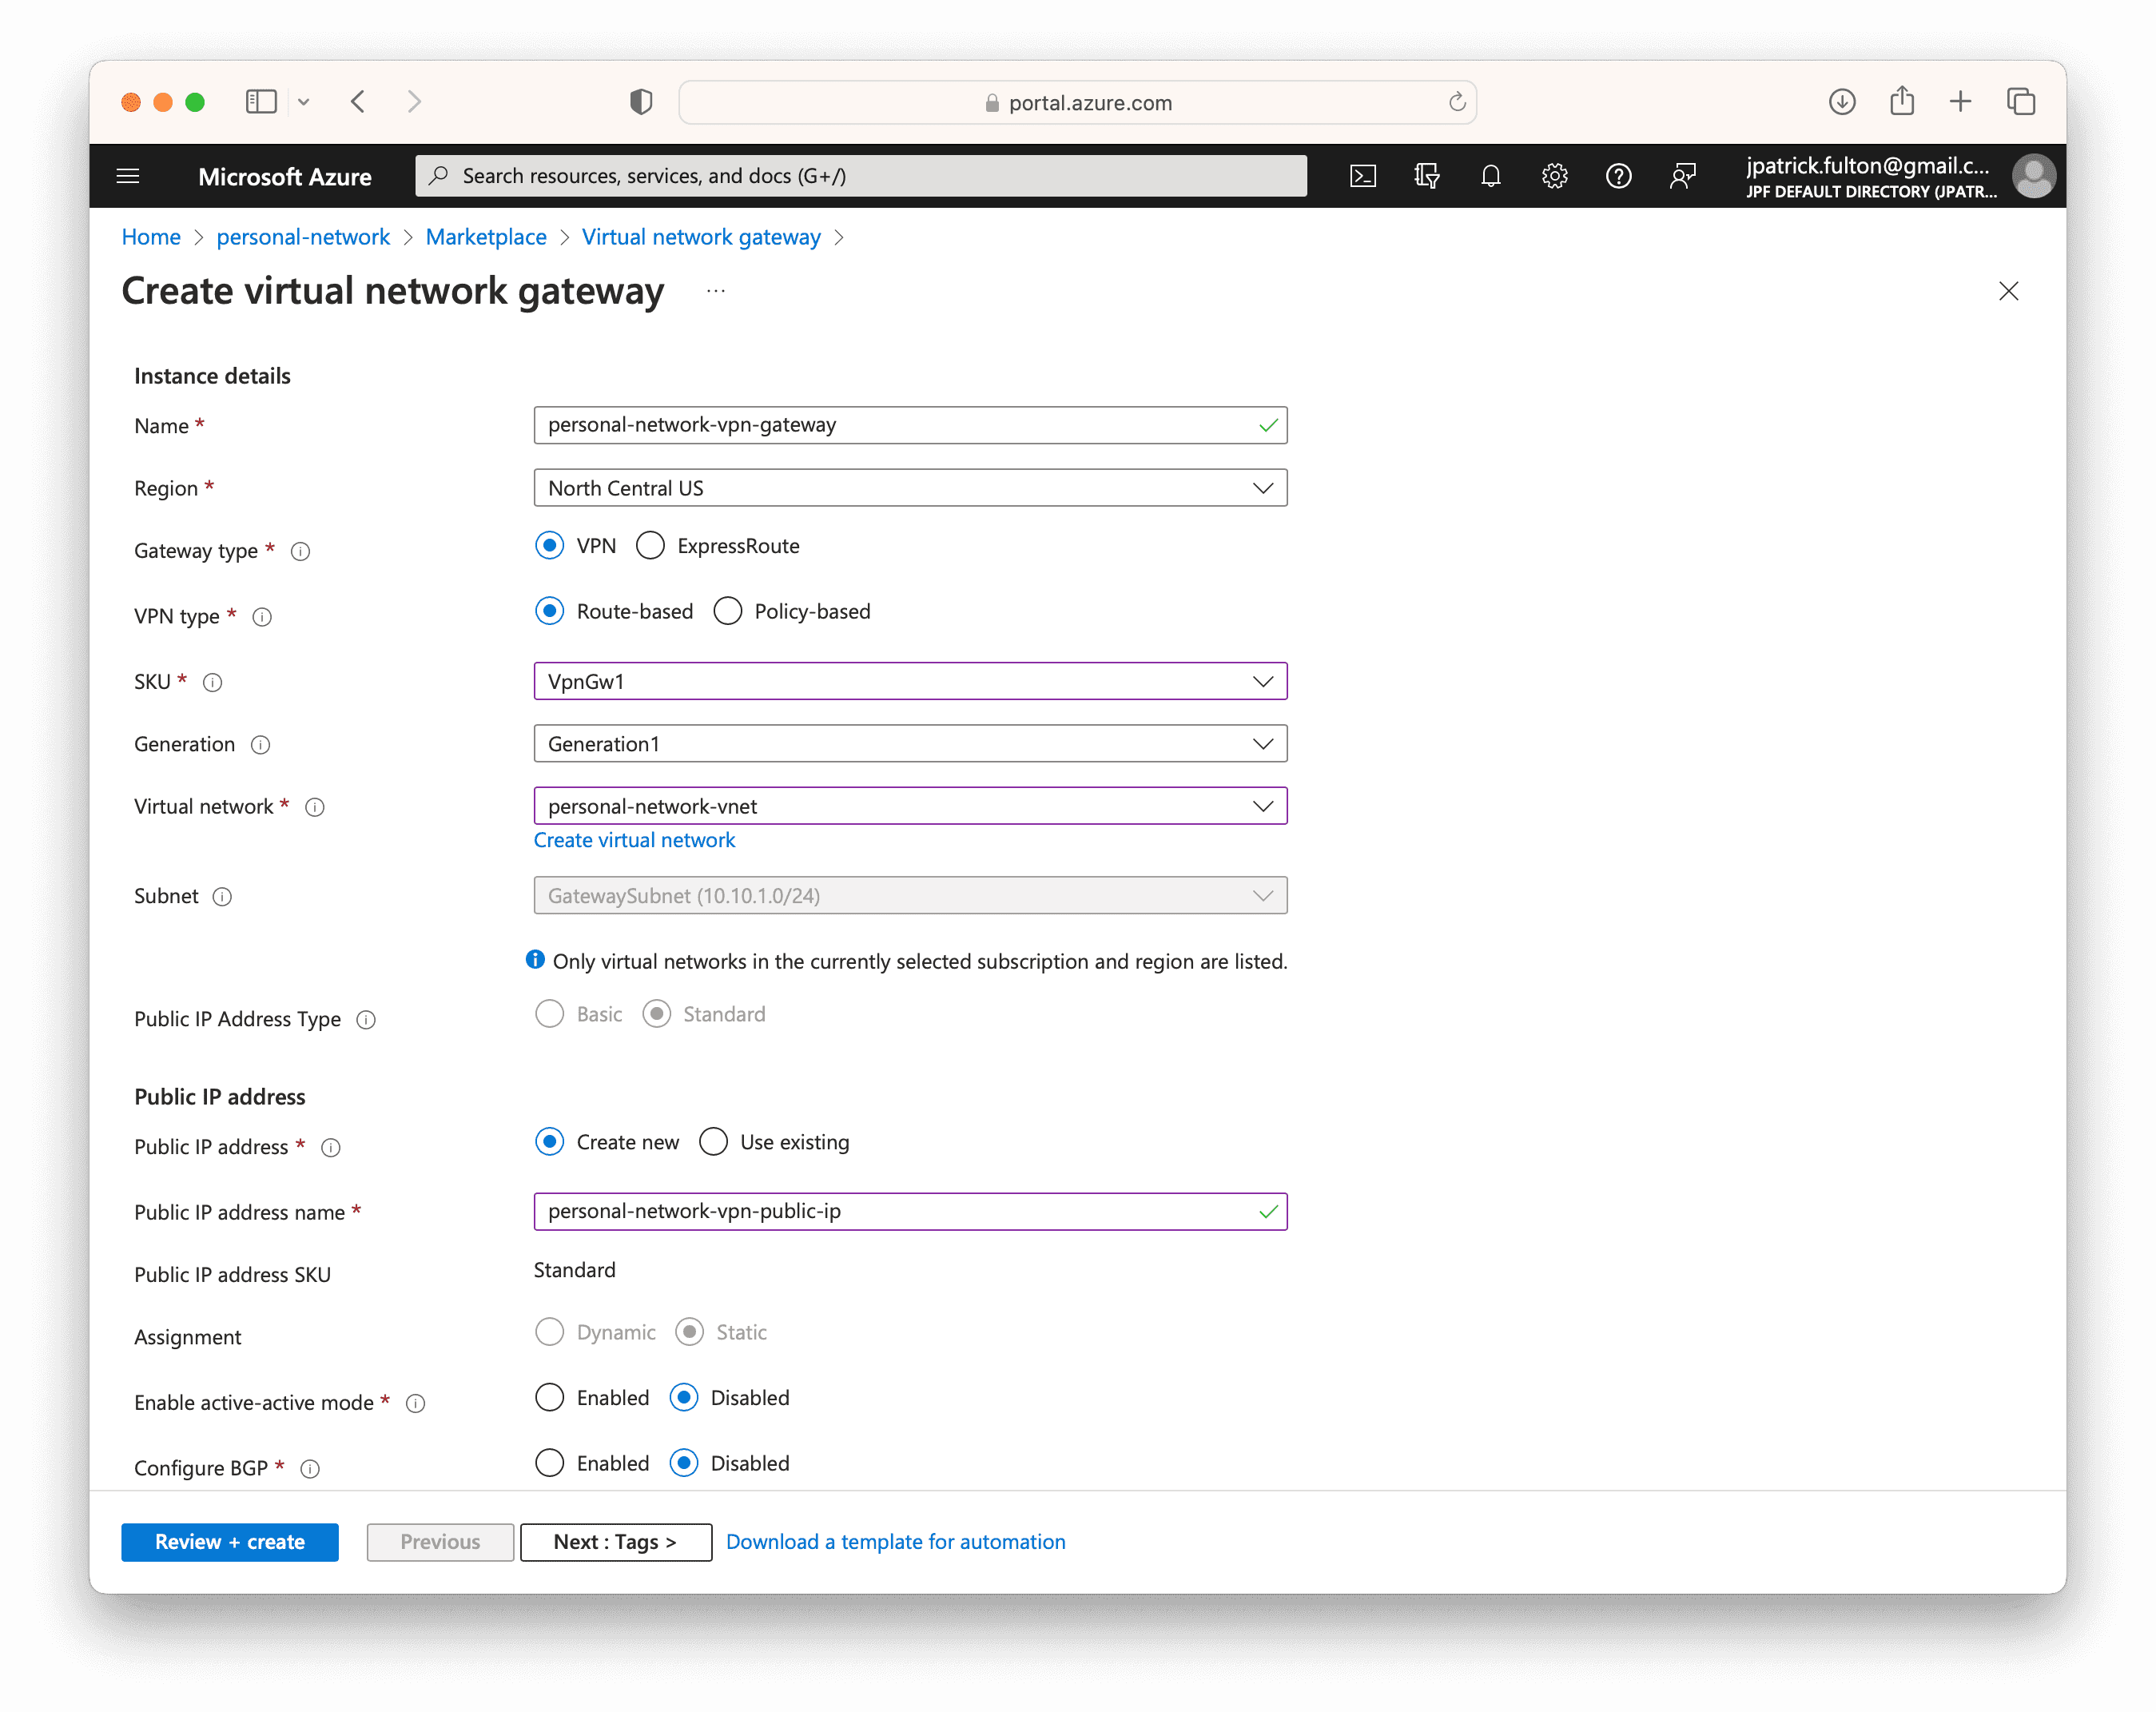
From the resource group created in the previous post, select Create from the toolbar and search for VPN Gateway in the marketplace.
Enter a name for the resource, select VpnGw1 for the SKU and select the correct
virtual network. Select Review + create to validate and start the deployment.
Configure the VPN Gateway
Once the resource is created, which may take several minutes, there are a number
of configuration steps that must be taken to generate certificates, create
client configuration files and set up the point-to-site feature. These steps
were taken on an on-premise Ubuntu Linux server running Ubuntu 22.04.2 LTS.
Select a location where the generated keys may be kept securely and
revisited as new client certificates are needed.
Generate a Root Certificate
The following steps are adapted from this Azure guide with modification to correct errors and problems encountered on the on-premise key management server.
First, install the dependencies for key generation using the following commands.
sudo apt update
sudo apt install strongswan
sudo apt install strongswan-pki
sudo apt install libstrongswan-extra-plugins
sudo apt install libtss2-rc0
Next, generate a certificate authority for use with the VPN gateway.
ipsec pki --gen --outform pem > caKey.pem
ipsec pki --self --in caKey.pem --dn "CN=VPN CA" --ca --outform pem > caCert.pem
Once the CA has been created, output its public key in base64 format to
a text file. We will need the contents of this file when copying the
public certificate into the Azure portal in the next step.
openssl x509 -in caCert.pem -outform der | base64 -w0 > my-root-cert.txtConfigure Point-to-site
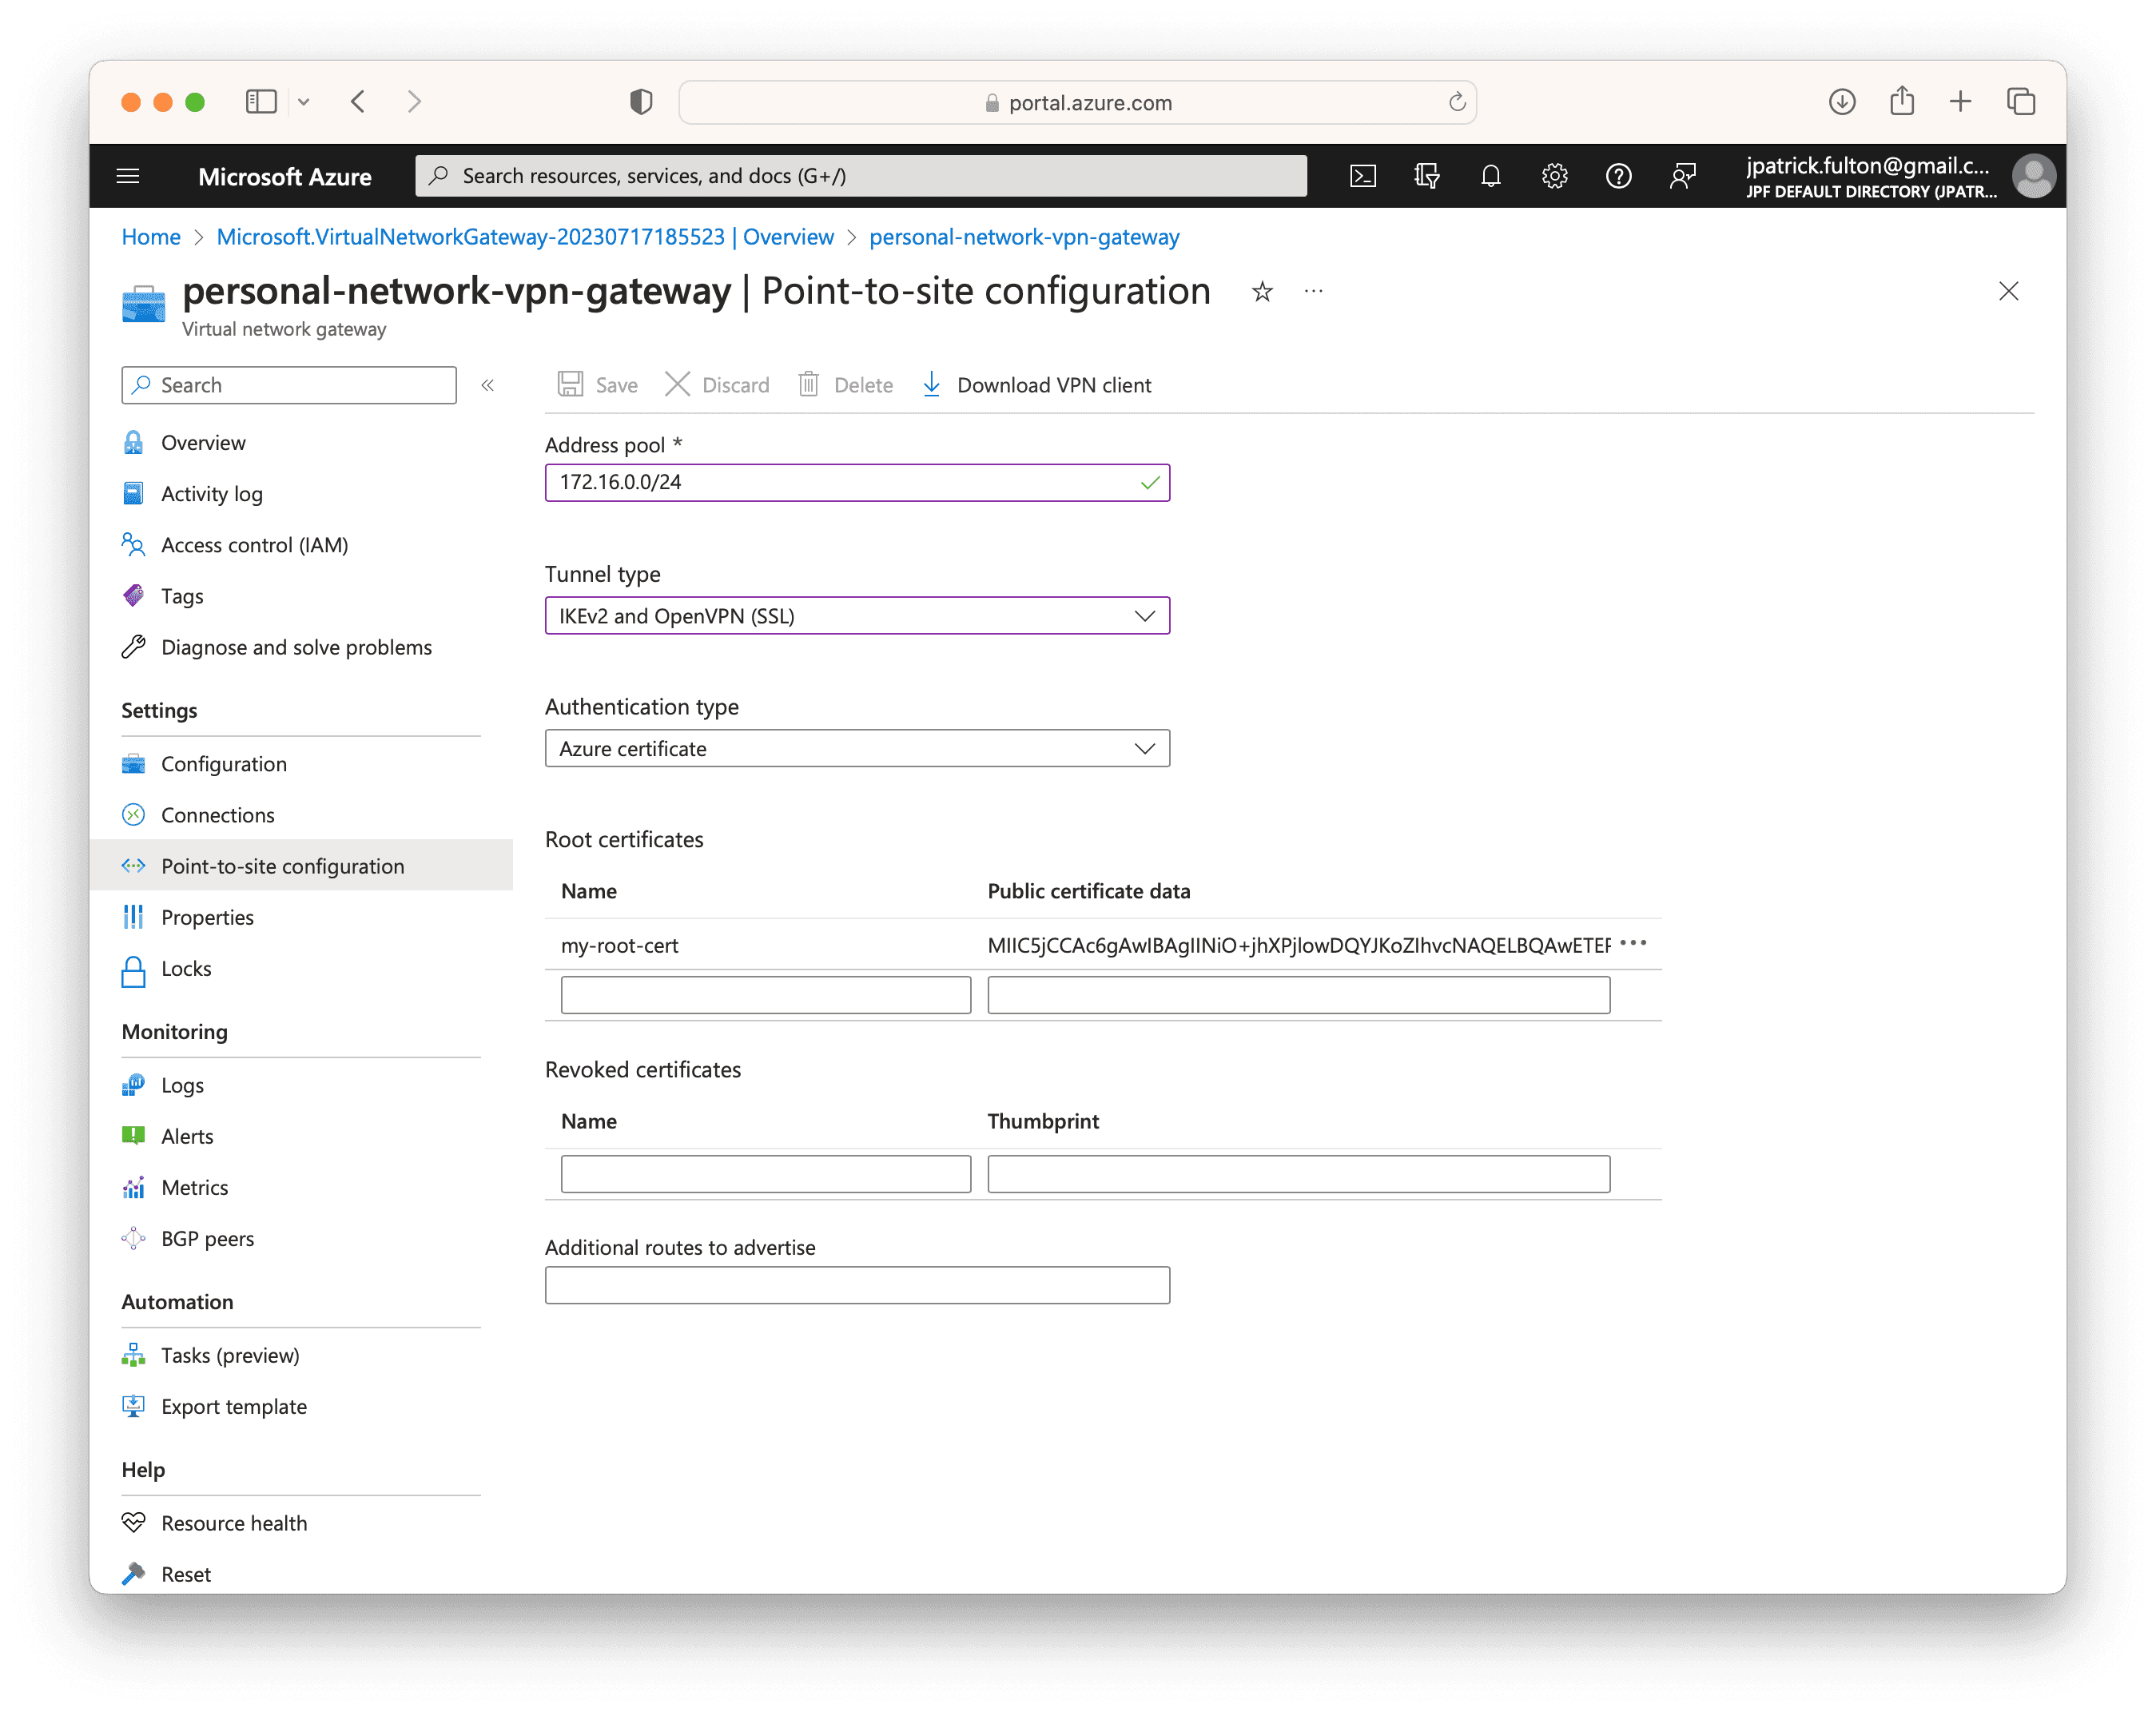
Navigate to the VPN gateway resource and select
Settings > Point-to-site configuration. Choose IKEv2 and OpenVPN (SSL)
from the tunnel type dropdown. Finally, paste the contents of my-root-cert.txt
as outputted from the previous command into the Root certificates section.
Select Save from the toolbar.
Create a Client Configuration
Download the Client Configuration Template
Once the save operation has completed, the Download VPN Client button will
be enabled. Click it to start the download of the client configuration template
archive. The contents of this zip file are shown below. The file contains
a template file for an OpenVPN connection that we will need to complete in
the next sections. Keep this archive securely as it contains a
pre-shared secret even before it is configured with a client certificate and
private key.
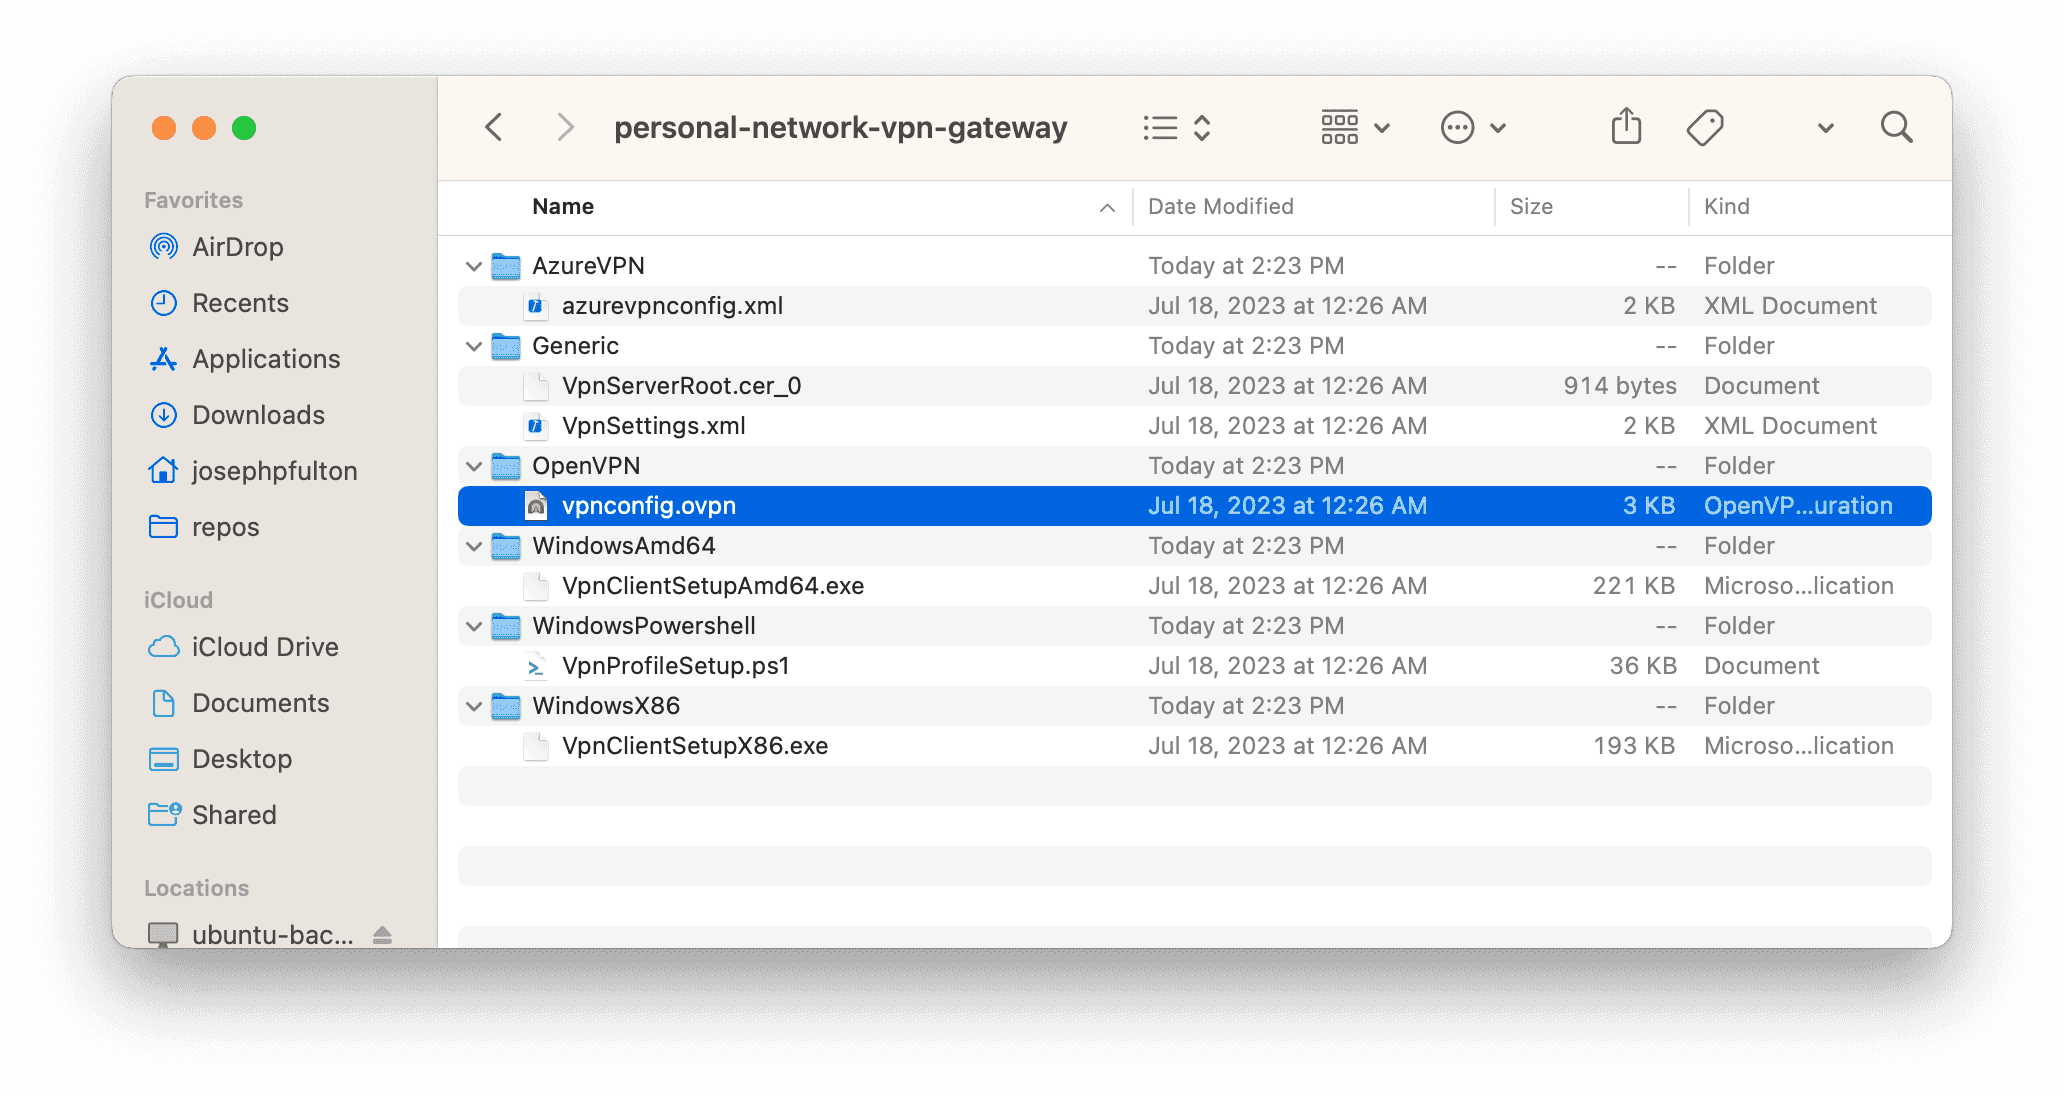
OpenVPN Client Configuration Template
Copy the vpnconfig.ovpn file from the archive to a separate location
to be edited. A sample of its contents is shown below. Note the sections
that need to be completed prior to use: $CLIENTCERTIFICATE and $PRIVATEKEY.
Once we generate a client certificate and key, we can paste their contents
into this file.
client
remote azuregateway-e287007a-007c-45ee-bbd1-a9f9f4ac4e9a-55b827be7af2.vpn.azure.com 443
verify-x509-name 'e287007a-007c-45ee-bbd1-a9f9f4ac4e9a.vpn.azure.com' name
remote-cert-tls server

dev tun
proto tcp
resolv-retry infinite
nobind

auth SHA256
cipher AES-256-GCM
persist-key
persist-tun

tls-timeout 30
tls-version-min 1.2
key-direction 1

log openvpn.log
verb 3

# P2S CA root certificate
<ca>
-----BEGIN CERTIFICATE-----
MIID...
-----END CERTIFICATE-----
</ca>

# Pre Shared Key
<tls-auth>
-----BEGIN OpenVPN Static key V1-----
8a50...
-----END OpenVPN Static key V1-----
</tls-auth>

# P2S client certificate
# Please fill this field with a PEM formatted client certificate
# Alternatively, configure 'cert PATH_TO_CLIENT_CERT' to use input from a PEM certificate file.
<cert>
$CLIENTCERTIFICATE
</cert>

# P2S client certificate private key
# Please fill this field with a PEM formatted private key of the client certificate.
# Alternatively, configure 'key PATH_TO_CLIENT_KEY' to use input from a PEM key file.
<key>
$PRIVATEKEY
</key>
Generate a Client Key and Certificate
This section of the post is adapted from the following Azure guide with modifications to work on the on-premise server and to script much of the process.
Create a script with the following contents in the same directory used to perform
the server certificate generation from above. Replace the value of the USERNAME
variable
to match the name of the client configuration you would like to create. Ideally,
each VPN client will be assigned its own certificate, name and private key.
#!/usr/bin/env bash
PASSWORD="password"
USERNAME="Home"

ipsec pki --gen --outform pem > "${USERNAME}Key.pem"
ipsec pki --pub --in "${USERNAME}Key.pem" | ipsec pki --issue --cacert caCert.pem --cakey caKey.pem --dn "CN=${USERNAME}" --san "${USERNAME}" --flag clientAuth --outform pem > "${USERNAME}Cert.pem"

openssl pkcs12 -in "${USERNAME}Cert.pem" -inkey "${USERNAME}Key.pem" -certfile caCert.pem -export -out "${USERNAME}.p12" -password "pass:${PASSWORD}"
Run the script and then execute the following command to create a plain
text version of the p12 binary file. The contents of profileinfo.txt will
contain sections that must be pasted into the client configuration file.
openssl pkcs12 -in "Home.p12" -nodes -out "profileinfo.txt"Assemble the Client Configuration File
With a plain text version of the certificate and private key generated, we can begin to assemble the client configuration file from the downloaded template.
Two certificates and one private key will exist in the profileinfo.txt file.
The certificate that is required by the ovpn configuration file is the child
certificate. It can be identified by the line that begins with subject=CN = and
the value you inserted into the script for the USERNAME variable. Copy the
certificate section into the client configuration in place of the line containing
$CLIENTCERTIFICATE.
Next, find the private key that is included in profileinfo.txt. Copy it into the
ovpn configuration file over the line containing $PRIVATEKEY.
Save the file and transfer it to the client using a secure mechanism.
Install the Configuration and Test a Client
With the client configuration downloaded to a local machine, one of several OpenVPN clients can be configured and then used for testing. Ubuntu Desktop includes an OpenVPN client. Additionally, Tunnelblick may be used on macOS and OpenVPN Connect may be used on Windows.
In a post later in the series, I will discuss setting up the client configuration on a Firewalla device.

Written by J. Patrick Fulton.